2000 – 4000 Series Time Recorder User’s Guide
Page 12
Changing the Motor
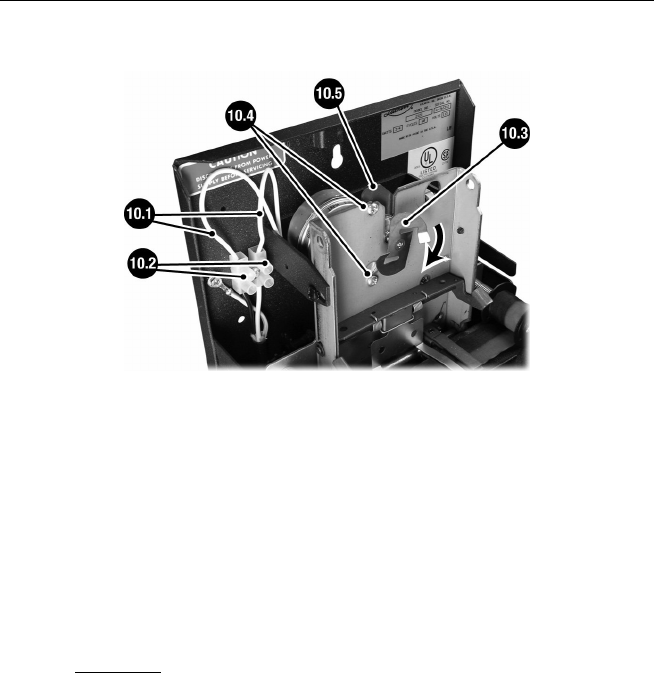
Figure 10
1. Unplug cord from wall outlet (except 2100BATT).
2. Remove type section from main frame (see “Replacing the Type
Section”).
3. Figure 10 shows a close-up of cam block terminal.
4. Disconnect Motor Wire Leads – Figure 10, 10.1 by turning
each Screw – 10.2 one-quarter of a turn counterclockwise.
5. Remove the Motor Clutch – Figure 10, 10.3 from its shaft.
The shaft has LEFT HAND threads – remove clutch by turning
clockwise.
6. Hold Motor Bracket – Figure 10, 10.4 and loosen Motor
Mounting Screws – Figure 10, 10.5. Remove and retain screws
and bracket from old motor.
7. Install motor clutch on new motor. Turn counterclockwise to
tighten. DO NOT OVERTIGHTEN OR BEND – YOU MAY DAMAGE
INTERNAL MOTOR GEARS.
8. Install new motor.
9. Install the new motor wire leads into the cam block terminal –
Figure 10, 10.1 by turning each Screw – 10.2 one-quarter of a
turn clockwise.
10.
Plug cord back in wall outlet, and reset the time.


