4-4 Service Manual
4096-00X
Drive Train Assembly Removal
1. Remove the front cover.
2. Remove the carrier frame.
3. Remove the base assembly.
4. Remove the maintenance station assembly.
5. Remove the printhead carrier assembly.
6. Remove the large feed roll and mid-frame assembly.
7. Disconnect the paper feed motor connector from the system
board.
8. Remove the two screws securing the drive train to the carrier
frame.
9. Push the drive train to the right and remove it from the carrier
frame.
Note: The paper feed motor is a part of the drive train assembly.
End-of-Form Flag Removal
1. Remove the front cover.
2. Remove the carrier frame from the base assembly.
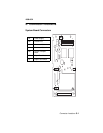
3. Disconnect all cables from the system board.
4. Remove the four screws securing the system board to the
carrier frame and remove the system board. (Take care when
removing the system board, not to damage the end-of-form
flag).
5. Remove the two center feed roller springs from the carrier
frame.
6. Unlatch the clip from the right side of the end-of-form flag.
7. Remove the spring, while noting its position.
8. Unlatch the left side and remove the end-of-form flag.


