


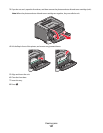
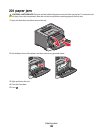
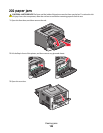
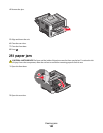

Clearing jams
By carefully selecting paper and specialty media and loading it properly, you should be able to avoid most jams. For
more information, see “Avoiding jams” on page 123. If jams do occur, follow the steps outlined in this chapter.
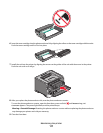
Warning—Potential Damage: Never use any tool to remove a jam. Doing so could permanently damage the fuser.
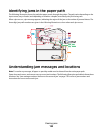
To resolve jam messages, you must clear the entire paper path, and then press
to clear the message and resume
printing. The printer prints a new copy of the page that jammed if Jam Recovery is set to On or Auto; however, the
Auto setting does not guarantee the page will print.
Note: Auto is the Jam recovery factory default setting. The printer reprints jammed pages unless the memory required
to hold the pages is needed for other printer tasks.
Avoiding jams
The following hints can help you avoid jams:
• Use only recommended paper or specialty media. For more information, see “Supported paper sizes, types,
weights, and capacities” on page 60.
• Do not load too much paper. Make sure the stack height does not exceed the indicated maximum height.
• Do not load wrinkled, creased, damp, bent, or curled paper.
• Flex, fan, and straighten paper before loading it.
• Do not use paper that has been cut or trimmed by hand.
• Do not mix paper sizes, weights, or types in the same stack.
• Do not feed envelopes that:
– Have excessive curl or twist
– Have windows, holes, perforations, cutouts, or embossing
– Have metal clasps, string ties, or folding bars
– Have an interlocking design
– Have postage stamps attached
– Have any exposed adhesive when the flap is in the sealed or closed position
– Have bent corners
– Have rough, cockle, or laid finishes
– Are stuck together or damaged in any way
• Store the paper in an appropriate environment.
• Do not remove trays while the printer is printing.
• Do not load the multipurpose feeder while the printer is printing. Load the multipurpose feeder prior to printing,
or wait for a prompt to load it.
• Push all trays in firmly after loading paper.
• Make sure the guides in the trays are properly positioned and are not pressing too tightly against the paper.
• Make sure all sizes and types are set correctly in the printer control panel menu.
• Make sure all printer cables are attached correctly. For more information, see the setup documentation.
Clearing jams
123