


Using the Product 11
Using the Product
3
Using the Scanner
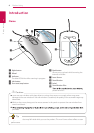
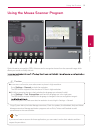
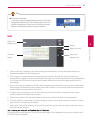
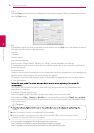
Remaining
available memory
display
Scan window
Scan image
Function
description /
mouse wheel,
stop scan
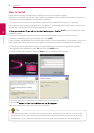
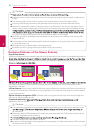
1. Place the mouse scanner on the desired document or photo, then press the Scan button on the side.
2. Once the scan starts, the screen turns black and the image where the mouse is positioned is displayed.
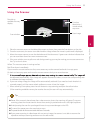
3. Move the mouse scanner to scan the desired area of the document. A green scan window indicates that
you can scan faster than the current movement rate.
4. If the scan window turns to yellow or red during scanning, you may be moving your mouse scanner too
fast. Try to slow it down.
Yellow: The mouse scanner is moving too fast.
Red: Slow down immediately.
If you move the mouse scanner too fast, some areas may not be scanned and result in empty spots.
Go back to the empty spots and move the mouse scanner slowly to re-scan the areas.
5.
be calibrated automatically. If the image still appears distorted or broken, re-scan the corresponding area
to calibrate the image manually.
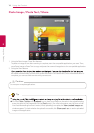
6. If you scan a large image, the image will be automatically reduced. If you need to check whether it is
scanned properly, roll the mouse wheel up/down to zoom in/out the image.
7. When scanning is complete, press the scan button to stop scanning and open the edit window.
(If the remaining available memory bar reaches the end, the scan will stop automatically.)
z
Pause: If the mouse is placed away from a document or photo, the scanning will pause. To resume
scanning, place the mouse scanner where the scanning is paused and move it left/right/up/down.
z
Avoid pausing the scan for a prolonged time as it may cause damage to the LED.
z
To cancel the pause, press the scan button once.
z
The pause function do not recommand to hold over 5 seconds.
z
If you pause scanning in a blank area with no text or image, the scanner is not able to resume the
operation and stops scanning and returns to the edit mode.
Tip