USER MANUAL
© LINDY ELECTRONICS LIMITED & LINDY-ELEKTRONIK GMBH - FIRST EDITION (June 2002)
TheRemoteUnit
LEDs
The Remote Unit has two LEDs (Status and On Line) to indicate the status of the Local and Remote units.
USB Keyboard and Mouse Port, Monitor Port
The remote USB keyboard and USB mouse plug into these connectors.
The remote monitor plugs into this connector.
Right Side Connector: Remote I/O
The Category 5 cable (RJ-45 connector) that connects back to the Local Unit plugs into this socket.
Installation of the KVM Extender USB Units
Setting up the KVM Extender System is simply a matter of plugging in the cables:
1. Make sure that all the equipment to be connected up is powered off.
2. Plug the cables from the local console devices (mouse, keyboard, monitor), into their ports on the Console side
of the Local Unit (KVM EXTENDER USB).
3. Plug the appropriate connectors on the USB and VGA cables into the CPU side of the KVM EXTENDER USB.
Note: A monitor extension cable male/female has to be used.
4. Plug the connectors on the other end of this cables into the appropriate ports on the computer system (or USB
KVM switch).
5. Plug either end of the Category 5 cable into the KVM EXTENDER USB Local Unit’s Remote I/O port.
6. Connect one of the power adapters (supplied with this package) to the Local Unit.
7. Plug the other end of the Category 5 cable into the I/O port of the Remote Unit (KVM EXTENDER USB).
8. Plug the cables from the remote console devices (USB mouse, USB keyboard, monitor), into their ports.
9. Connect the second power adapter (supplied with this package).
Operation
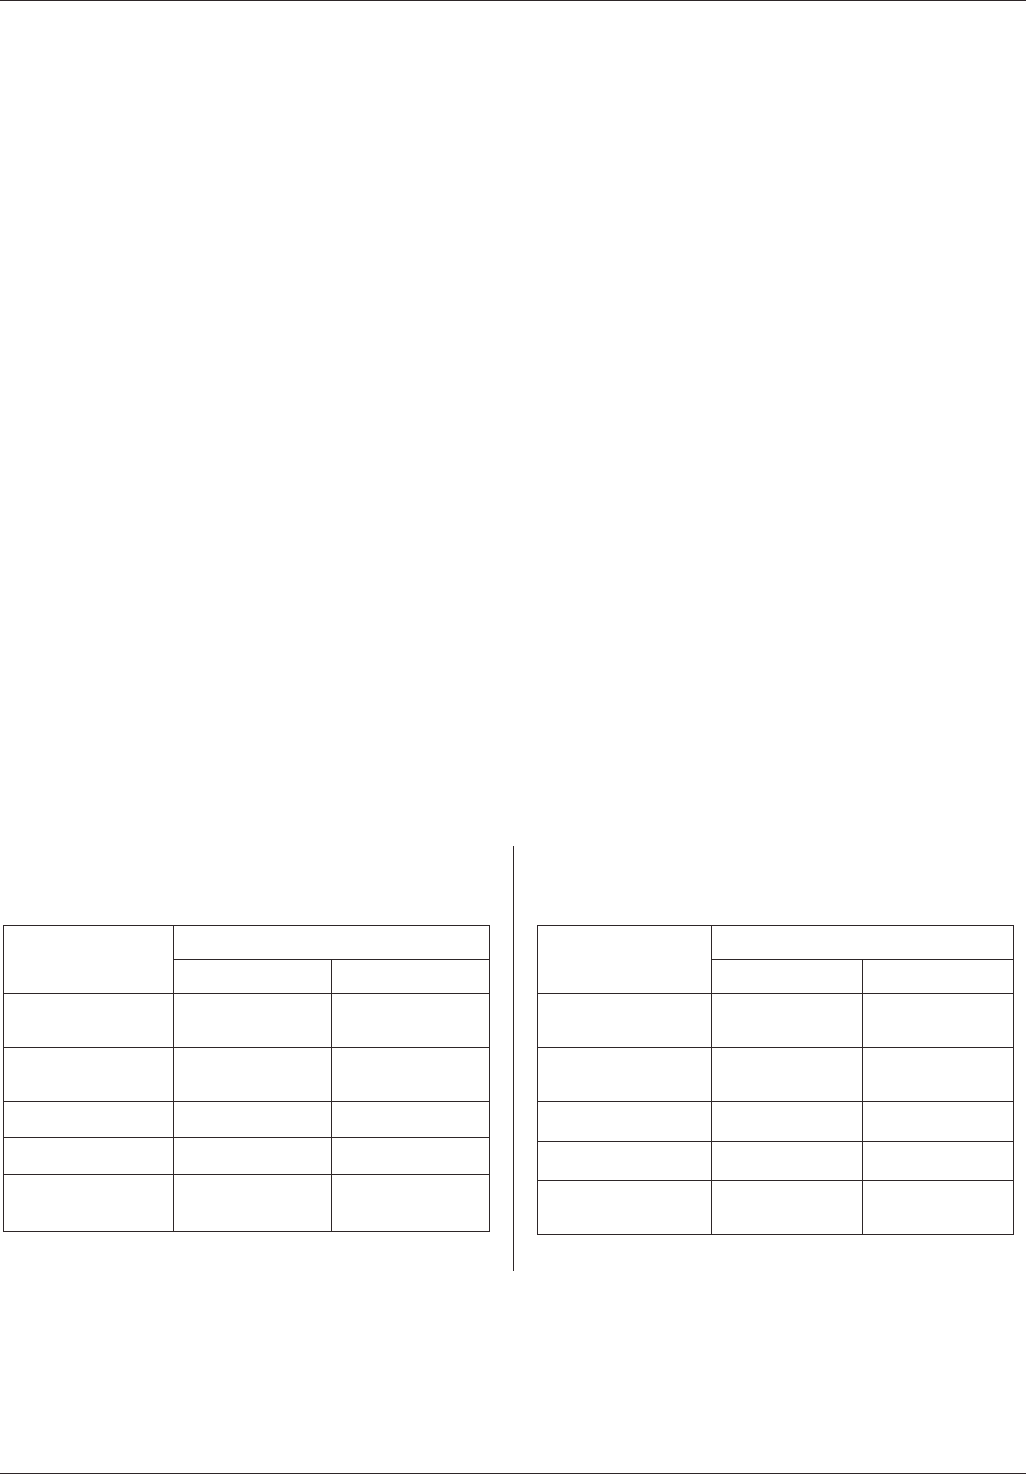
The Local and Remote Units each have two LEDs to indicate their operating status, as shown in the tables, below:
Local Unit
LEDsOperating Mode
LOCAL REMOTE
Local Console
ACTIVE
Flash OFF
Remote Console
Active
OFF Flash
Error / Disconnect ON OFF
Not Ready OFF OFF
Neither Console
Active
ON ON
Remote Unit
LEDsOperating Mode
STATUS ONLINE
Local Console
ACTIVE
OFF OFF
Remote Console
Active
Flash Flash
Error / Disconnect OFF Flash
Not Ready OFF OFF
Neither Console
Active
ON ON
Troubleshooting
If no video picture is shown make sure that all cables are securely plugged into their sockets. If you still see no
video picture then try connecting with a short Cat.5 patch cable to make sure it is not due to a faulty Cat.5 STP or
FTP cable.


