


Installation Manual
English
- 4 -
Installation
Note: Please make sure all devices are turned off before beginning the installation
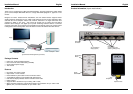
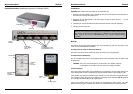
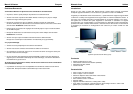
1. Using a DVI cable (not included), connect your display or projector to the DVI OUT port on
the DVI Switch Remote.
2. Connect each of your source devices (e.g. DVD player, PC, Set-Top Box) to the DVI IN
ports.
3. Plug the mains adapter into the power supply socket and then into the mains, to power on
the DVI Switch Remote.
4. Power on all the connected devices.
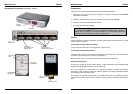
Operation
You can select the input source in two ways: from the push button on the front of the switch or
via the infra-red remote control.
Front Panel Push Button Selection:
The front panel push button is used to select the current channel. Pressing the button during
normal operation will cause the next channel to be selected.
Remote Control Selection:
Use the channel select buttons to directly select the required channels. The Channel Up/Down
buttons allow you to move up and down the different channels.
Note: It is normal for there to be a short delay when switching between devices as the screen
refreshes.
IR Code Selection:
When the unit is first powered on, the currently selected IR code will be displayed by the LED
indicator (A, b, C, d). The default is A.
If the remote control conflicts with another device you can reconfigure it to use one of four
different IR codes. Press and hold an IR code button (A, B, C or D) until the appropriate letter
(A, b, C, d) is displayed by the LED indicator on the switch.
If the DVI Switch does not respond to the IR remote control, for instance after the battery has
been replaced, simply press and hold any of the IR code buttons until it is registered and
displayed by the LED indicator.
Note: If your devices are equipped with an HDMI connector you can use DVI to
HDMI cables or adapters. Please be aware, however, that the DVI interface
supports display signals only. Therefore, you will need to make separate audio
connections from your source to your display/amplifier etc.
Installation Manual
English
- 5 -
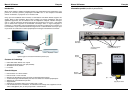
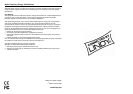
Connecting mixed VGA and DVI equipped devices
Please note: To connect analogue VGA devices, your display must feature either a 15 Way
VGA or a DVI-I (Analogue and digital) input.
When connecting VGA analogue devices, you must use a combination if DVI-I cables and VGA
adapters to make the connection from both the device and the display to the DVI Switch
Remote. This is because DVI-D cables do not support analogue signals.
Example:
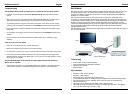
1. To connect a PC equipped with a VGA output to the DVI IN port on the DVI Switch Remote,
you can use either:
A 2m VGA TO DVI Adapter Cable (LINDY No. 41206, UK only)
or...
A DVI Analogue to VGA Adapter Cable (LINDY No. 41222) and a
15 Way Male to Male S-VGA Cable
2. To connect the DVI Switch Remote to a display, to enable analogue VGA support, you will
need:
A DVI-I Cable
Or a DVI-I to DVI-D + VGA Splitter Cable (LINDY No. 41219) if connecting to a
display with a separate VGA input.
3. Connect the DVI-I cable from the DVI Switch Remote’s DVI OUT port to the DVI-Female
socket on the splitter cable.
4. Plug the DVI-I/splitter cable into the VGA and/or DVI inputs on your display.
Note: When connecting mixed VGA and DVI equipped devices to the DVI Switch
Remote, we recommend you use a display that supports auto switching between
digital and analogue inputs. If your display does not support this function, you will
have to manually select the required input each time you switch between DVI and
VGA devices.