


User Manual English
4
Installation
Important: Make sure all of your computers and peripherals are switched OFF before
proceeding with the installation.
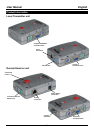
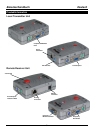
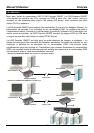
Transmitter Unit
If the distance between the Local Transmitter and the Remote Receiver is greater than 90
metres (300 feet) you must set DIP switches 1 & 2 on the side of the Transmitter unit to ON.
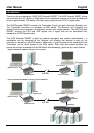
1. Connect your keyboard, mouse and monitor to the Local Console ports on the
Transmitter unit.
2. Using a 3-in-1 KVM cable, connect the ports labelled PC / KVM on the Transmitter unit to
the keyboard, mouse and video ports on your computer or the keyboard, video and
mouse control console ports on your KVM switch.
3. Connect the CAT5 (or higher) network cable to the RJ-45 port
Remote Receiver Unit
1. Connect your keyboard, mouse and monitor to the ports on the Remote unit.
2. Using the supplied 3-in-1 KVM cable, connect the keyboard, video and mouse ports
labelled LOCAL PC to the keyboard, video and mouse ports on your local PC.
3. Connect the CAT5 (or higher) network cable to the RJ-45 port
4. Connect the power supply jack to the port on the Remote unit. Plug the power supply into
the mains
Powering up and checking the installation
1. Power on the PC connected to the Remote Receiver unit and then power on the PC /
KVM Switch installation connected to the Local Transmitter unit.
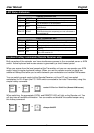
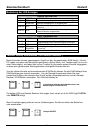
2. Check the display quality at the Remote Receiver console. Rotate the VGA Tuning
control to adjust the picture quality. If this does not provide a good enough picture quality
try changing the dip switches to all possible settings and try VGA tuning again until you
get the best result.