


17
Chapter 5: Configuring the Wireless-G Router for Mobile Broadband
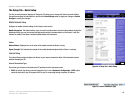
Overview
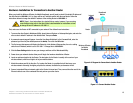
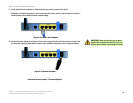
Wireless-G Router for Mobile Broadband
Chapter 5: Configuring the Wireless-G Router for Mobile
Broadband
Overview
Linksys recommends using the Setup CD-ROM for first-time installation of the Router. If you do not wish to run
the Setup Wizard on the Setup CD-ROM, then you can use the Web-based Utility to configure the Router. For
advanced users, you may configure the Router’s advanced settings through the Web-based Utility.
This chapter will describe each web page in the Utility and each page’s key functions. The utility can be accessed
via your web browser through use of a computer connected to the Router. For a basic network setup, most users
will use these two screens of the Utility:
• Basic Setup. On the Basic Setup screen, enter the settings provided by your Internet Service Provider (ISP).
• Management. Click the Administration tab and then the Management tab. The Router’s default password is
admin. To secure the Router, change the Password from its default.
There are seven main tabs: Setup, Wireless, Security, Access Restrictions, Applications & Gaming, Administration,
and Status. Additional tabs will be available after you click one of the main tabs.
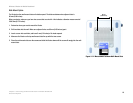
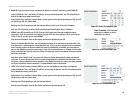
To access the Web-based Utility, launch Internet Explorer or Netscape Navigator, and enter the Router’s default IP
address, 192.168.1.1, in the Address field. Then press Enter.
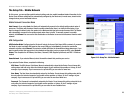
A password request page will appear. Leave the User Name field blank. The first time you open the Web-based
Utility, use the default password admin. (You can set a new password from the Administration tab’s Management
screen.) Then click the OK button.
HAVE YOU: Enabled TCP/IP on your PCs? PCs
communicate over the network with this protocol.
Refer to “Appendix D: Windows Help” for more
information on TCP/IP.
NOTE: For first-time installation, Linksys
recommends using the Setup Wizard on the Setup
CD-ROM. If you want to configure advanced settings,
use this chapter to learn about the Web-based Utility.
Figure 5-1: Password Screen