


LD 500/500V User Manual
Quick Installation Guide
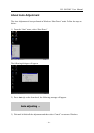
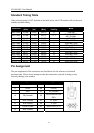
PC Setting
Before connecting your PC to the LD 500/500V LCD monitor, change the display screen
settings (resolution and frequency) to match those below.
fH: 30kHz - 61kHz fV: 56Hz – 75Hz
Important:
The maximum resolution of this LCD monitor is 1024 x 768 at a maximum
frequency of 75Hz
Using the LCD monitor with Windows
95/98
A monitor information file can be found on the installation disk included in the package.
This file includes information to ensure the best performance when the monitor is used with
Windows 95/98. Please install the enclosed utility and select “LD 500/500V” from the
monitor list in Windows 95/98. Refer to the readme.txt file in the Monitor Installation Disk.
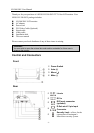
Connecting the Cables
1. Be sure that both the PC and the LCD monitor are turned OFF.
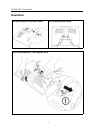
2. Place the LCD monitor as shown below to remove the connector cover. (Please refer to
illustration .) When removing the connector cover, push in the buttons gently, and lift
the cover up. To protect the LCD panel from scratching, it is recommended that a soft
cloth or cushion be placed underneath the LCD panel.
3. Plug the signal cable into the D-Sub
or DVI (optional) socket at the rear of
the monitor. When connecting the signal cable, check that the shape of the cable connector
matches the shape of socket on the LCD monitor. (Please refer to illustration .)
4. Plug the other end of the signal cable into the video connector at the rear of the PC.
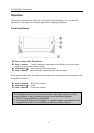
5. Plug the power cord into the power connector at the rear of the LCD monitor.
(Please refer to illustration .)
6. Plug the other end of the power cord into a power outlet.
7. Plug one end of the audio cable into the line-in port
of the LCD monitor and the
other end into the speaker-out port on the PC. (Please refer to illustration .)
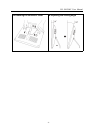
8. After connecting all cables, fit the cables into the grooves to secure them and ensure that
they can be extend out of the sides of the connector cover. (Please refer to illustration )
9. Using your left hand, press the spring latch to the left, while using your right hand to pull
the T-bar support strut into position. Then, release the spring latch. (Please refer to
illustration )
10. Reattach the connector cover (Please refer to illustration .)
11. Adjust the viewing angle (Please refer to illustration .)
- 6 -
Important:
While pulling out the T-bar support strut, be sure to press the spring latch to the left.
Otherwise, damage may be caused to the monitor.