


SMART 216 / 232
11
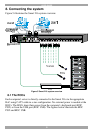
8.3 Connecting the two KVM consoles
Connect a keyboard monitor and mouse to each of the User 1 and User 2 ports as
follows:
1. Connect the monitor connectors to the Monitor ports.
2. Connect the keyboard connectors to the Keyboard ports.
3. Connect the mouse connectors to the Mouse ports.
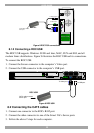
8.4 Connecting to the power supply
1. Using the Power cord provided, connect the Smart 216 to a socket outlet with
grounding connection. Only use the power cord supplied with the unit.
2. Switch on the Smart 216.
9. Configuring the system
Configuring the system includes:
• Assigning server names
• User and security settings
• Maintenance
9.1 Connecting to the Local Area Network (LAN)
Configuration is done mainly via a web interface. For this purpose connect a
network cable to the LAN port of the Smart 216. This must be done before
powering on the Smart 216.
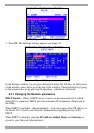
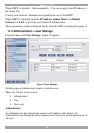
9.2 Setting network parameters via the OSD
By default, Smart 216 boots with an automatically assigned IP address from a
DHCP (Dynamic Host Configuration Protocol) server on the network. The DHCP
server provides a valid IP address, gateway address and subnet mask.
You can identify the IP address from the OSD. Also where there is no DHCP
server set the IP address via the OSD as follows:
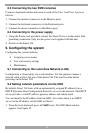
1. From the local keyboard, press left Shift twice. The OSD Main window
appears. See Figure 10.