


USER GUIDE
12
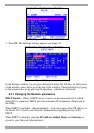
Figure 10 OSD Main window
2. Press F2. The Settings window appears see Figure 11.
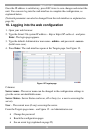
Figure 11 Settings window
In the Settings window you navigate downwards using the Tab key. At the bottom
of the window, press tab to go to the top of the window. Change settings by typing
in the selected area or by pressing the spacebar – whichever is relevant.
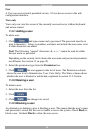
9.2.1 Changing the Network parameters
DHCP Enable – When a DHCP server is active on the same network to which
Smart 216 is connected, DHCP provides automatic IP assignment. (Displayed in
the OSD).
When DHCP is disabled – (Recommended) – You can assign a fixed IP address to
the Smart 216. Consult your Network Administrator regarding the use of the
DHCP.
When DHCP is disabled, enter the IP Address, Subnet Mask, and Gateway as
given by your Network Administrator.