


MENU DESCRIPTIONS
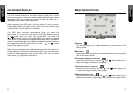
LANGUAGE
Select this control and then use the and select buttons (2) to
choose on of the seven language you need.
RESET
Reset the currently highlighted control to the factory setting. User must
be using factory preset video mode to use this function.
* Note:
You can get the best quality of the image under full-screen image with a running
computer. The function of AUTO-TUNE may not work properly if background color
is dark or if the input image does not fill the screen. (ex: DOS text mode)
We strongly recommend that you just run the AUTO-LEVEL & AUTO-TUNE function
to get the best image quality when you unpack the monitor or when you install dif-
ferent VGA card or PC.
MENU DESCRIPTIONS
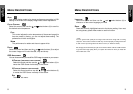
AUTO
Auto adjust display mode to its utmost performance according to VGA
setting. In the event of the display image needs further adjustment.
COLOR CONTROL
Select this control, then use the and select buttons (2) to scroll to
the desired color temperature.
COOL
This control adjusts the color temperature of the screen image this
item are preset by factory, you can not adjust these setting. The
perfomance is bluer and brighter.
WARM
The performance is redder and closer to paper white.
PHASE
Select this control and then use the and select buttons (2) to adjust
the screen image until it looks focused, crisp and sharp.
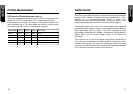
OSD ADJUSTMENT
You can choose where you would like OSD image to appear on your screen.
H-POSITION (HORIZONTAL OSD-POSITION)
Select this control and then use the and select buttons (2) to
center the OSD-Screen horizontally on the screen.
V-POSITION (VERTICAL OSD-POSITION)
Select this control and then use the and select buttons (2)
to center the OSD-Screen vertically on the screen.
EXIT
To exit the sub menu.
8 9