


EN-12
Thus, a 16:9 aspect image will not utilize 25% of the height of a 4:3 aspect image displayed by this projector. This
will be seen as darkened (unlit) bars along the top and bottom (vertical 12.5% height respectively) of the 4:3
projection display area whenever displaying a scaled 16:9 aspect image in the vertical center of the 4:3 projection
display area.
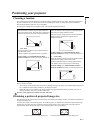
The projector should always be placed horizontally level (like flat on a table), and positioned directly perpendicular
(90° right-angle square) to the horizontal center of the screen. This prevents image distortion caused by angled
projections (or projecting onto angled surfaces).
The modern digital projector does not project directly forward (like older style reel-to-reel film projectors did).
Instead, digital projectors are designed to project at a slightly upward angle above the horizontal plane of the
projector. This is so that they can be readily placed on a table and will project forward and upwards onto a screen
positioned so that the bottom edge of the screen is above the level of the table (and everyone in the room can see the
screen).
You can see from the diagram on page 13, that this type of projection causes the bottom edge of the projected image to
be vertically offset from the horizontal plane of the projector.
If the projector is positioned further away from the screen, the projected image size increases, and the vertical offset
also increases proportionately.
When determining the position of the screen and projector, you will need to account for both the projected image size
and the vertical offset dimension, which are directly proportional to the projection distance.
When fine streaks are seen on projected images
This is due to interference with the screen surface and is not a mal-function. Replace the screen or displace the focus a
little.
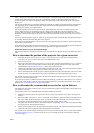
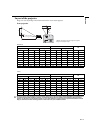
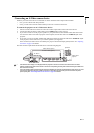
How to determine the position of the projector for a given screen size
1. Determine the aspect ratio of your screen, 16:9 or 4:3. If you have a 4:3 screen, refer to the table labeled
"(Standard)". If you have a 16:9 screen, refer to the table labeled "(16:9)".
2. Select your screen size.
3. Refer to the table and find the closest match to your screen size in the left columns labeled "Screen". Using this
value, look across this row to the right to find the corresponding average distance from screen value in the
column labeled "Distance from the screen: L". This is the projection distance.
4. On that same row, look across to the right column and make note of the "Hd" value. This will determine the final
vertical offset placement of the projector in relation to the edge of the screen.
5. The recommended position for the projector is aligned perpendicular to the horizontal center of the screen, at the
distance from the screen determined in step 3 above, and offset by the value determined in step 4 above.
For example, if you are using a 4:3 aspect ratio, 100-inch screen, distance from the screen is 3.8 m and with a vertical
offset of 15 cm at Zoom position wide.
If you place the projector in a different position (to that recommended), you will have to tilt it down or up to center the
image on the screen. In these situations, some image distortion will occur. Use the Keystone function to correct the
distortion. See "Correcting keystone" on page 24 for details.
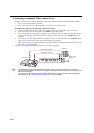
How to determine the recommended screen size for a given distance
This method can be used for situations where you have purchased this projector and would like to know what screen
size will fit in your room.
The maximum screen size is limited by the physical space available in your room.
1. Measure the distance between the projector and where you want to position the screen. This is the projection
distance.
2. Refer to the table "(Standard)" or "(16:9)", and find the closest match to your measurement in the distance from
the screen column. If the min and max values are available on the table, check that your measured distance is
between the min and max distances listed on either side of the average distance value.
3. Using this value, look across that row to the left to find the corresponding "Screen". That is the projected image
size of the projector at that projection distance.
4. On that same row, look across to the right column and make note of the "Hd" value. This will determine the final
placement of the screen in relation to the horizontal plane of the projector.
For example, if your measured projection distance was 4.0 m and your screen aspect ratio is 4:3, the closest match in
the "Distance from the screen: L" column is from 3.8 m to 4.2 m. Looking across this row shows that a 100-inch
screen is required.