EN-12
Obtaining a preferred projected image size
The distance from the projector lens to the screen, the zoom setting (if available), and the video format each factors in
the projected image size.
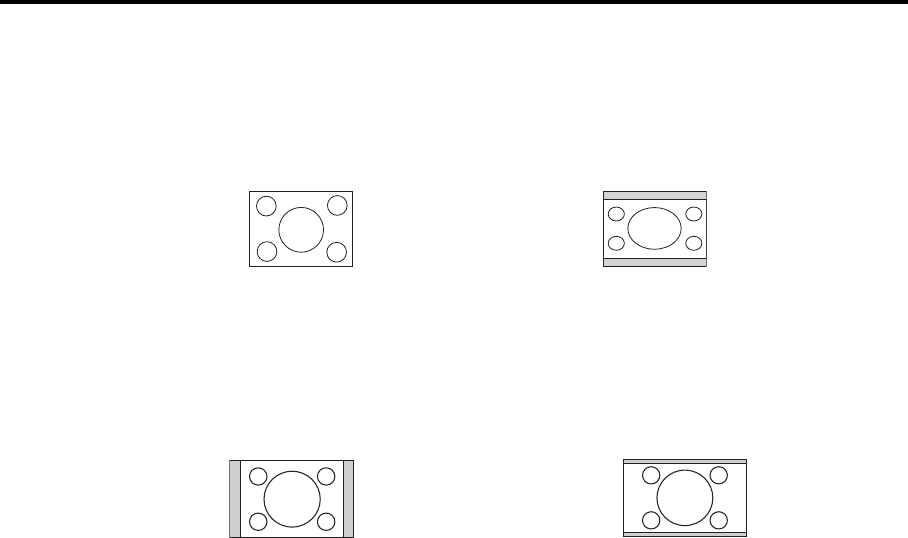
4:3 is the native aspect ratio of EX240U. To be able to project a complete 16:9 (widescreen) aspect ratio image, the
projector can resize and scale a widescreen image to the projector's native aspect width. This will result in a
proportionally smaller height equivalent to 75% of the projector's native aspect height.
Thus, a 16:9 aspect image will not utilize 25% of the height of a 4:3 aspect image displayed by this projector. This
will be seen as darkened (unlit) bars along the top and bottom (vertical 12.5% height respectively) of the 4:3
projection display area whenever displaying a scaled 16:9 aspect image in the vertical center of the 4:3 projection
display area.
16:10 is the native aspect ratio of EW270U. To be able to project a complete 16:9 (widescreen) aspect ratio image, the
projector can resize and scale a widescreen image to the projector's native aspect width. This will result in a
proportionally smaller height equivalent to 90% of the projector's native aspect height.
Thus, a 16:9 aspect image will not utilize 10% of the height of a 16:10 aspect image displayed by this projector. This
will be seen as darkened (unlit) bars along the top and bottom (vertical 5% height respectively) of the 16:10 projection
display area whenever displaying a scaled 16:9 aspect image in the vertical center of the 16:10 projection display area.
The projector should always be placed horizontally level (like flat on a table), and positioned directly perpendicular
(90° right-angle square) to the horizontal center of the screen. This prevents image distortion caused by angled
projections (or projecting onto angled surfaces).
The modern digital projector does not project directly forward (like older style reel-to-reel film projectors did).
Instead, digital projectors are designed to project at a slightly upward angle above the horizontal plane of the
projector. This is so that they can be readily placed on a table and will project forward and upwards onto a screen
positioned so that the bottom edge of the screen is above the level of the table (and everyone in the room can see the
screen).
You can see from the diagram on page 14, that this type of projection causes the bottom edge of the projected image to
be vertically offset from the horizontal plane of the projector.
If the projector is positioned further away from the screen, the projected image size increases, and the vertical offset
also increases proportionately.
When determining the position of the screen and projector, you will need to account for both the projected image size
and the vertical offset dimension, which are directly proportional to the projection distance.
When fine streaks are seen on projected images
This is due to interference with the screen surface and is not a mal-function. Replace the screen or displace the focus a
little.
4:3 aspect image in a 4:3 aspect display area 16:9 aspect image scaled to a 4:3 aspect display area
4:3 aspect image in a 16:10 aspect display area 16:9 aspect image scaled to a 16:10 aspect display area


