


EN-25
ENGLISH
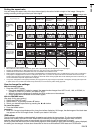
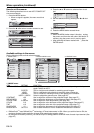
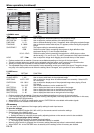
2. INSTALLATION menu
ITEM SETTING FUNCTION
SCREEN SIZE
4 op
tions
Select according to the screen size.
VERTICAL LOCATION
±
26 Use to adjust the position (height) of the projected image.
LAMP MODE STANDARD Select this option when you want to view images in a well-lit room.
LOW Select to moderate the intensity of the lamp. The fan operating sound is
reduced and the lamp lifetime becomes longer.
AUTO POWER ON ON / OFF
When ON is chosen, the lamp is automatically lit when the power cord is
plugged in the wall outlet. Choose ON when using the projector mounted on
the ceiling.
• The projector is in the stand-by mode when the lamp is off. Use the remote
control to turn on the lamp.
AUTO POWER OFF OFF / 5 - 60min
Use to set the time elapsed before the projector enters the stand-by mode
when there is no signal input from the source.
SPLASH SCREEN
ON / OFF Choose ON to display the splash screen when the power is turned on.
BACK COLOR BLUE / BLACK
Use to change the color of the screen that appears when no signal is supplied.
IMAGE REVERSE
OFF Select when viewing images from the front with the projector installed on the
fl oor.
MIRROR Select when viewing images projected from the behind of the screen with the
projector installed on the fl oor.
INVERT Select when viewing images projected from the behind of the screen with the
projector installed on the ceiling.
MIRROR INVERT Select when viewing images from the front with the projector installed on the
ceiling.
TRIGGER OUT ON /OFF Choose ON to output the trigger output signal (12 V) from the TRIGGER
terminal when the lamp illuminates.
TEST PATTERN CROSS HATCH
Select to show the test cross hatch pattern.
WHITE
Select to show the maximum brightness image.
BLACK Select to show the minimum brightness image.
• When LAMP MODE has been set to LOW, the lamp mode changes from STANDARD to LOW about one minute after turn-on.
• When the lamp mode is switched, the projected image may fl icker. This is not a product malfunction.
• Do not change the setting of LAMP MODE frequently.
• To cancel the test pattern, press any button.
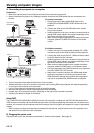
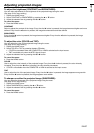
3. FEATURE menu
ITEM SETTING FUNCTION
ASPECT AUTO Select to change the aspect ratio automatically depending on the input signal.
4:3 Select to project images with an aspect ratio of 4:3.
16:9 Select to project images with an aspect ratio of 16:9. (Linearly stretched.)
ZOOM1 Select to enlarge and project images of CinemaScope size.
ZOOM2 Select to enlarge and project images of Vista size.
STRETCH Select to enlarge to 16:9 and project of the images with an aspect ratio of 4:3.
(Non-linearly stretched.)
REAL Select to project images in their original size as input. Not available when the
keystone adjustment is applied.
PASSWORD FUNCTION
Use to enable or cancel the password lock. See page 30 for details.
MENU POSITION
2 options Use to change the position of the menu.
CINEMA MODE
AUTO
The fi lm mode will be automatically activated when a fi lm source signal is input.
OFF The fi lm mode will not be activated.
VIDEO SIGNAL 8
options
When AUTO is selected, the appropriate video format is automatically selected
depending on the input signal. If the image isn’t displayed correctly, select the
desired video format manually.
SET UP AUTO Select AUTO for normal use. When LANGUAGE is not set to
and 460i or
TV60 signal is inputted, the SET UP changes to 7.5% automatically.
OFF Select to make black lighter.
3.75%/7.5% Select to make black intense.
• When 7.5% is chosen, the brightness is decreased by set-up cancel func-
tion for U.S. Choose OFF when the image is dark.
SCART INPUT ON /OFF Choose ON when connecting the projector with a device equipped with the
SCART terminal that can output RGB signal. SCART terminal is used mainly
in Europe. Choose OFF normally. (Available only for the input signal from the
COMPUTER IN/COMPONENT VIDEO IN terminal.)
LANGUAGE 10 languages Use to select the language used in the menus.
RESET ALL OK
Use to reset the settings of the menu (excluding PASSWORD FUNCTION and
LANGUAGE) to the factory setting values.
• CINEMA MODE can be adjusted only when a TV60,480i signal is being displayed.
• When SCART INPUT is set to ON, normal computer signals aren't projected.
• Use a SCART-BNC (or SCART-Mini D-SUB 15P) cable (option) when connecting this projector with an AV device
equipped with the SCART terminal.
• Some AV devices equipped with the SCART terminal aren't compatible with this projector.