


EN – 17
ENGLISH
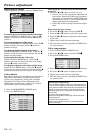
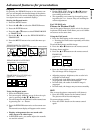
4 SIGNAL
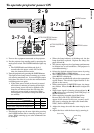
MEMORY CALL ........
Use to select AUTO, USER 1 or USER 2. See below.
HORIZ. POSITION ....
Use to adjust the horizontal position of the image.
VERT. POSITION .....
Use to adjust the vertical position of the image.
FINE SYNC. .......Use to synchronize the projector with PC input signals so
that the image is not blurred.
TRACKING .........Use to avoid image noise such as wide stripes.
COMPUTER INPUT ....
The unit adjusts itself automatically when connected to
either DVD players with a component video output
terminal (Y, CB, CR or Y, PB, PR) or equipment with HDTV
signal output capabilities. In cases where the unit is
connected to equipment that include an RGB output
terminal and which output HDTV signals, adjust the unit
to RGB mode.
HOLD .................. Adjusts the image when curving near the top.
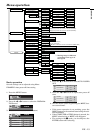
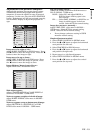
5 SIGNAL - USER (Normally, there is no need for adjustments.)
CLAMP POSITION/
CLAMP WIDTH .........
If you use something similar, the brighter colors of the
projected image may become blurred. In this case, adjust
CLAMP POSITION or CLAMP WIDTH.
HORIZ.PIXELS .. Use to adjust the width of the image. The image size
grows wider as the number increases. (Adjust to the
horizontal pixels of the input signal for normal setting.)
VERT.LINES ...... Use to adjust the height of the image. The image size
grows higher as the number increases. (Adjust to the
vertical lines of the input signal for normal setting.)
PLL ...................... Use to adjust the image when skewed on top. Select AUTO for normal setting.
VERT.SYNC. ...... Use to adjust the image when its motion does not run smoothly. Select AUTO for normal
setting.
SHUTTER(U) ..... Use to adjust the image when the noise etc. appears on top part of image.
SHUTTER(L) ...... Use to adjust the image when the noise etc. appears on bottom part of image.
User memory for signal setting
This projector can memorize the maximum of 2 signal menu settings.
Memorizing the setting
1. Select MEMORIZE in the SIGNAL menu, and press the ENTER button.
2. Press the $ or % button to select the memory which you wish to record (USER 1 or USER 2).
3. Press the ENTER button.
Initialite the setting which has been changed (Default)
Select RESET in the SIGNAL menu, and press the ENTER button.
• When initializing, selection buttons will not work for about 2 - 18 seconds.
Select the user setting
Select MEMORY CALL in SIGNAL menu, and press the $ or % button to select the memory (USER 1 or USER 2).
Reset the recorded setting
1. Select DELETE in the SIGNAL menu, and press the ENTER button.
2. Press the $ or % button to select the memory which you wish to reset (USER 1 or USER 2).
3. Press the ENTER button.
The recorded setting will be reset.
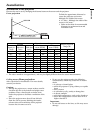
CLAMP POSITION
SIGNAL–USER
0
CLAMP WIDTH + 5
HORIZ. PIXELS 800
PLL AUTO
SHUTTER(L) 0
VERT. LINES 600
VERT. SYNC. AUTO
SHUTTER(U) 0
?
MEMORY CALL
SIGNAL
AUTO
HORIZ. POSITION 208
VERT. POSITION 22
TRACKING 1056
COMPUTER INPUT RGB
FINE SYNC. 24
HOLD AUTO
USER MEMORIZE DELETE DEFAULT
R G B
R G B
A
U
Opt
XGA60