


EN-16
Menu operation (continued)
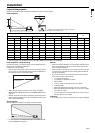
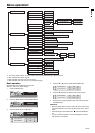
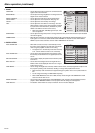
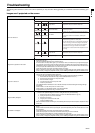
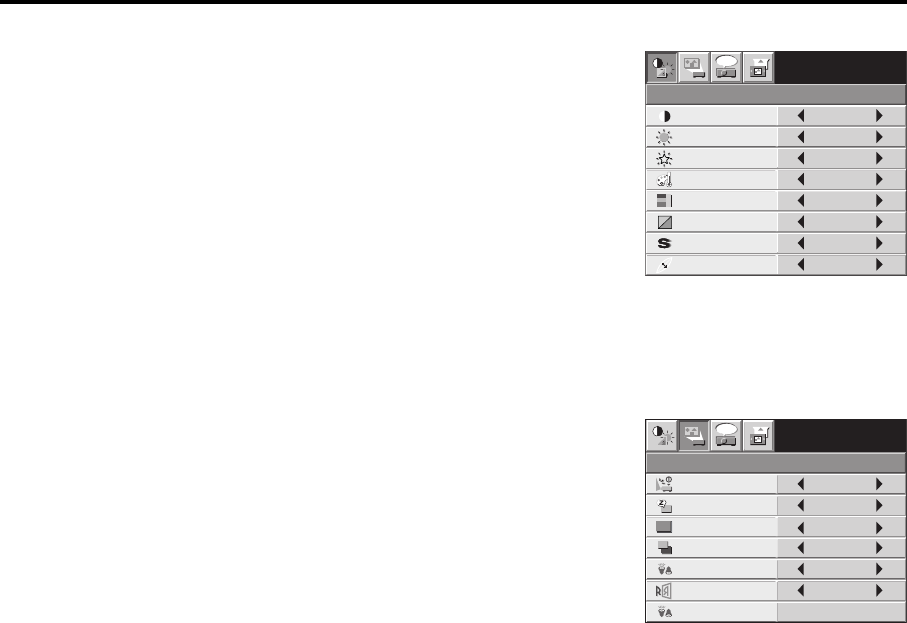
1IMAGE
CONTRAST ................................................Use to adjust the image contrast. The contrast becomes
higher as the value increases.
BRIGHTNESS.............................................Use to adjust the image brightness. The image becomes
brighter as the value increases.
WHITE ENHANCE......................................Use to adjust the white level of the projected image.
COLOR TEMP ............................................Use to adjust the color temperature. See page 18.
COLOR.......................................................Use to adjust the color intensity of the image.
TINT............................................................Use to adjust the color balance of the image. The color
balance shifts to green as the value increases and shifts
to purple as the value decreases. (Available only when
VIDEO or S-VIDEO is chosen as the source.)
• When the TV50 (PAL, SECAM) signal is input, TINT
can’t be adjusted.
SHARPNESS..............................................Use to adjust the image sharpness. The image becomes sharp as the value increases. (Not available
with certain signals.)
GAMMA MODE ..........................................When AUTO is selected, the appropriate gamma mode is automatically selected depending on the
input signal. For normal use, select AUTO. Select DYNAMIC for computer sources. Select STAN-
DARD for sport scenes and video sources. Select THEATER for film sources.
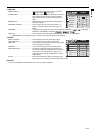
2 INSTALLATION
AUTO POWER ON .....................................When ON is chosen, the lamp is automatically lit when
the power cord is plugged in the wall outlet. Choose ON
when using the projector mounted on the ceiling.
• The projector is in the stand-by mode when the lamp
is off. Use the remote control to turn on the lamp.
AUTO POWER OFF....................................Use to set the time elapsed before the projector enters
the stand-by mode when there is no signal input from the
source.
SPLASH SCREEN......................................Choose ON to display the splash screen when the power
is turned on.
BACK COLOR.............................................Use to select the background from among BLUE and
BLACK, which will be displayed when there is no signal
input from the source.
LAMP MODE ..............................................Use to change the brightness of the lamp. When LOW is chosen, the lamp brightness is kept low and
the projector operating noise is reduced, resulting in a longer lamp replacement interval.
• When the lamp mode is switched, the projected image may flicker. This is not a product malfunc-
tion.
• Do not change the setting of LAMP MODE frequently.
• When LAMP MODE has been set to LOW, the lamp mode changes from STANDARD to LOW
about one minute after turn on.
IMAGE REVERSE ......................................Use to reverse the projected image. Select MIRROR for rear projection with the tabletop-mounted
projector. Select MIRROR INVERT for front projection with the ceiling-mounted projector.
LAMP HOURS ............................................The duration of illumination of a lamp converted in the Low mode is displayed.
CONTRAST
IMAGE
0
BRIGHTNESS 0
STANDARD
0
COLOR
0
SVGA60
WHITE ENHANCE 10
TINT
0SHARPNESS
COLOR TEMP.
GAMMA MODE
opt.
STANDARD
INSTALLATION
opt.
ON
BACK COLOR
AUTO POWER ON
AUTO POWER OFF
SPLASH SCREEN
LAMP MODE
ON
BLUE
OFF
OFF
STANDARD
OFFIMAGE REVERSE
0
SVGA60
LAMP HOURS