EN-8
1
2
Preparating your projector (continued)
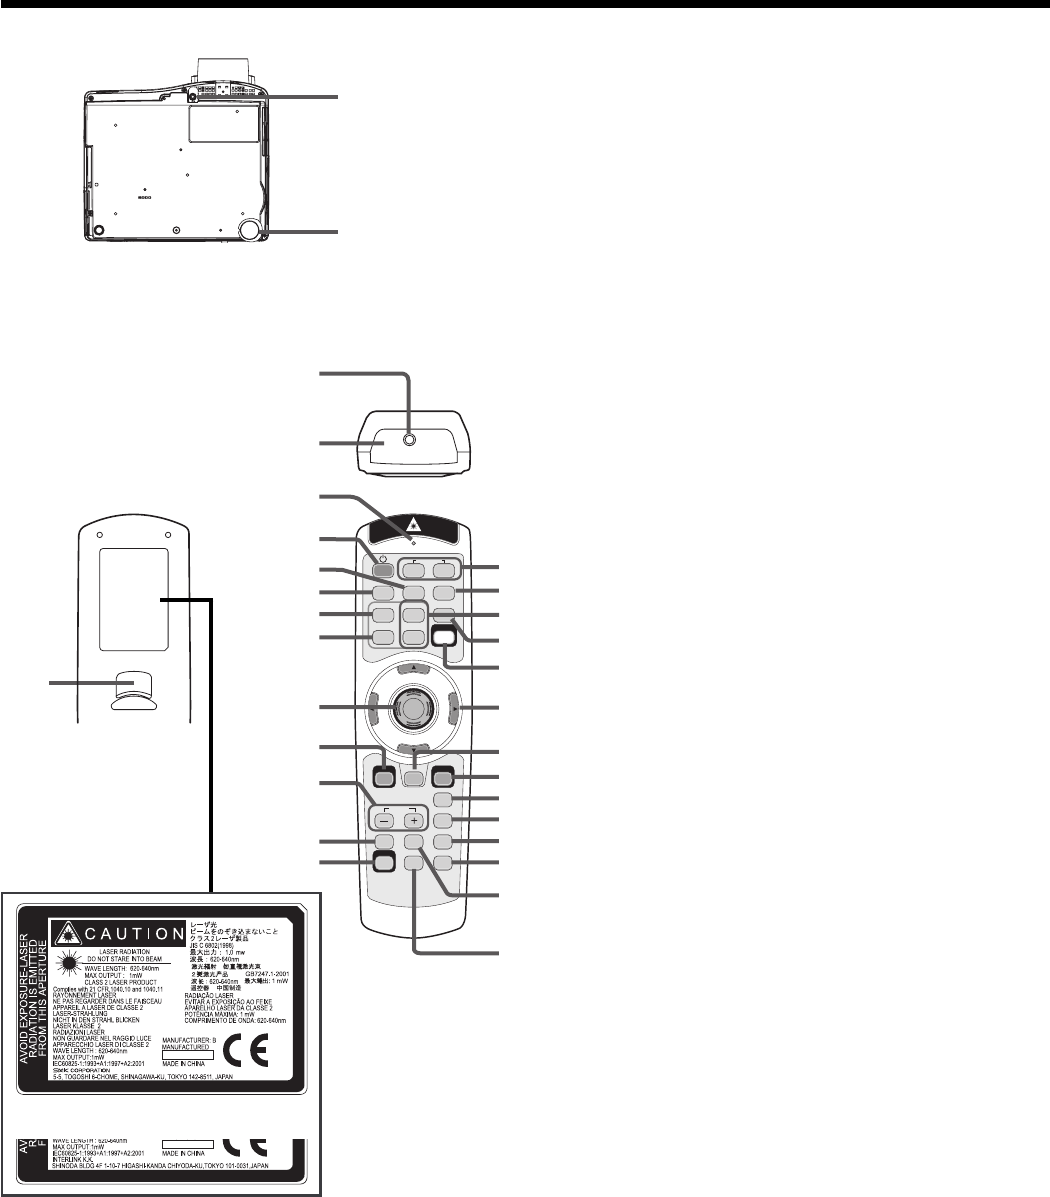
Bottom side
1 Adjustment foot (for vertical position)
2 Adjustment foot (for horizontal position)
Remote control
1 Laser aperture
2 Transmission window
3 Indicator
4 POWER button
5 VIDEO button
6 DVI-D (HDCP) button
7 HOME button
8 END button
9 Mouse pointer
10 MENU button
11 + , - (VOLUME) buttons
12 WALL SCREEN button
13 CE (Color Enhancer) button
14 MUTE button (Audio/Video)
15 EXPAND button
16 STILL button
17 PinP button
18 ASPECT button
19 KEYSTONE button
20 ENTER button
21 R-CLICK button
22 Direction buttons
23 LASER button
24 AUTO POSITION button
25 PageUP and PageDOWN buttons
26 S-VIDEO button
27 COMPUTER 1, 2 buttons
28 L-CLICK button
• The + and - buttons are used in the KEYSTONE
adjustment and the EXPAND mode in addition to
the volume control.
• The direction buttons are used for the keystone
adjustment and fi ne adjustment (
W
and
X
buttons
only).
• Pressing the LASER button emits a laser beam.
Even when you keep holding down the LASER but-
ton, it is emitted only one minute. To keep emitting
it longer, press the LASER button again.
• You can disable the LASER button to prevent laser
radiation due to misuse of the button.
How to disable the LASER button
While holding the LASER button down, press the T
button 3 times.
How to enable the LASER button
While holding the LASER button down, press the S
button 3 times.
• Whenever the batteries are replaced, the LASER
button is enabled.
About the laser beam
This remote control is a Class 2 laser product. (Max. output: 1 mW, Wavelength: 620-640 nm)
Beam Divergence: 6 m distance about 10.0 mm x 10.0 mm (±6.0 mm)
Caution:
• Pressing the LASER button on the remote control emits a laser beam. Do not look into the laser beam directly. Do
not point the laser beam at anyone. Looking at the laser beam directly may damage eyesight.
• Use of controls or adjustments or procedures other than those specifi ed herein may result in hazardous radiation exposure.
• This remote controller cannot be repaired.
1
2
COMPUTER
VIDEO S-VIDEO
DVI-D(HDCP)
HOME PageUP
END PageDOWN
AUTO POSITION
KEYSTONE
ASPECT
PinP
STILL
EXPAND
MUTE
WALL SCREEN
1
2
VOLUME
3
4
5
6
7
8
9
10
11
12
27
26
25
24
23
22
21
20
19
17
18
16
14
13
15
CE
MENU
ENTER
LASER
R-CLICK
28
or
There are 2 types of labels placed on the back of the
remote control and either of them is placed on it.


