


NI WAP-3701/3711 User’s Manual Getting Started
2-5
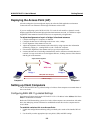
Deploying the Access Point (AP)
After the settings have been configured, deploy the AP to the field application environment.
Connect the AP to an Ethernet LAN through an Ethernet switch or hub.
If you are configuring a pair of NI WAP-3701/3711 units for AP mode for a dynamic or static
bridging application and external high-gain directional antennas are used, it is difficult to adjust
alignments of the antennas when the two devices are separated by a long distance.
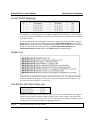
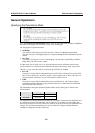
To adjust the alignments of a pair of bridges’ directional antennas:
1. Connect each bridge to a computer via Ethernet
2. Configure the date rate of each bridge to the lowest value, 1 Mbps.
3. Fix the alignment of the antenna on one side.
4. Adjust the alignment of the antenna on the other side by using response time information
obtained by pinging (i.e., running PING.exe) the “fixed-side” computer.
5. Fine-tune the alignment of the antenna until you get a best response time.
6. Increase the data rate of each bridge simultaneously until a maximum workable data rate is
reached. You may not be able to use the highest data rate, 54 Mbps, because of the distance
and the gain of the antennas.
Bridge 1
WDS Link
Computer 1 Computer 2
Bridge 2
PING (ICMP Echo Request)
ICMP Echo Reply
Adjust antenna alignment
Setting up Client Computers
The TCP/IP and IEEE 802.11g-related settings of wireless client computers must match those of
the Access Point.
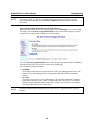
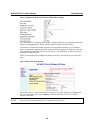
Configuring IEEE 802.11g-related Settings
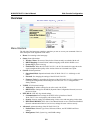
Open Internet Explorer and type the NI WAP-3701/3711’s IP address in the Address field. Press
Enter to establish the connection.
Before the TCP/IP networking system of a wireless client computer can communicate with other
hosts, the underlying wireless link must be established between this wireless computer and an
Access Point.
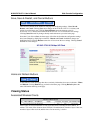
To establish a wireless link to an Access Point:
1. Launch the configuration/monitoring utility provided by the vendor of the installed WLAN
NIC.
2. Use the utility to make appropriate Operating Mode, SSID, and WEP settings.