


English-18
Appendix
If you need detailed information about the controls, please use the advanced menu.
<How to use the advanced menu>
• Turn off your monitor.
• Turn on your monitor by pushing the “POWER” and “SELECT” button at the same time for at least one second
simultaneously. Then press the control buttons (EXIT, LEFT, RIGHT, UP, DOWN).
• You will see the Advanced menu.
This menu is larger than the normal OSM.
<How to exit the advanced menu>
• Turn off and restart your monitor in the normal way.
To make an adjustment, ensure that the tag is highlighted, then press “SELECT”.
To move to another tag, press “EXIT”, then press “Left” or “Right” to highlight another tag.
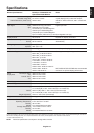
Tag1 Brightness Adjusts the overall image and screen background brightness.
Press “Left” or “Right” to adjust.
Contrast Adjusts the image brightness and contrast in relation to the background.
Press “Left” or “Right” to adjust.
Auto Contrast Adjusts the image displayed for non-standard video inputs. Press “SELECT” to adjust.
(Analog input only) Any adjustment requires the image to have white portions.
Auto Black Level Automatically adjusts the black level. Any adjustment requires the image to have black
(Analog input only) portions. Press “SELECT” to activate Auto Adjust.
ECO Mode Decreases the amount of power consumed by reducing the brightness level.
1: Decreases the brightness by 25%.
2: Decreases the brightness by 50%.
CUSTOM: Decreases the brightness level as determined by the user.
ECO Mode Custom Allows the user to set a preferred brightness level when ECO Mode is in use.
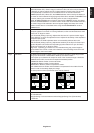
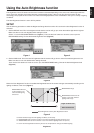
Auto Brightness Auto Brightness has three settings.
OFF: No function.
1: Adjusts the brightness automatically, by detecting the brightness level of your
environment and adjusting the monitor with your BRIGHTNESS setting.
2: Adjusts the brightness automatically for the best BRIGHTNESS setting based on the
white display area. The environmental brightness sensor (Ambibright sensor) has no function.
Note: Do not cover environmental brightness sensor (Ambibright sensor).
Black Level Allows you to manually adjust the black level. Press “Left” or “Right” to adjust.
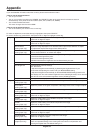
Tag2 R-H.position Adjusts the position of the red component of the image. Press “Left” or “Right” to adjust.
(Analog input only)
G-H.position Adjusts the position of the green component of the image. Press “Left” or “Right” to adjust.
(Analog input only)
B-H.position Adjusts the position of the blue component of the image. Press “Left” or “Right” to adjust.
(Analog input only)
R-FINE Adjusts the “FINE” setting of the RED component of the image.
(Analog input only) Press “Left” or “Right” to adjust.
G-FINE Adjusts the “FINE” setting of the GREEN component of the image.
(Analog input only) Press “Left” or “Right” to adjust.
B-FINE Adjusts the “FINE” setting of the BLUE component of the image.
(Analog input only) Press “Left” or “Right” to adjust.
R-SHARPNESS Adjusts the sharpness of the red component of the image. Press “Left” or “Right” to adjust.
(Analog input only)
G-SHARPNESS Adjusts the sharpness of the green component of the image.
(Analog input only) Press “Left” or “Right” to adjust.
B-SHARPNESS Adjusts the sharpness of the blue component of the image.
(Analog input only) Press “Left” or “Right” to adjust.
DVI Long Cable Compensates for image degradation caused by using a long DVI cable.
(Digital input only) There are 4 possible settings, with “0” being the lowest level of compensation and
“3” being the highest level. The default setting is “1”.