


English-20
H.ZOOM The image is expanded from 1 to 3 times in the horizontal (H. EXPANSION) direction by
(Available in Custom 0.01 increments.
Expansion mode only)
V.ZOOM The image is expanded from 1 to 3 times in the vertical (V. EXPANSION) direction by
(Available in Custom 0.01 increments.
Expansion mode only)
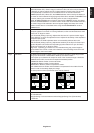
ZOOM POS. Sets the point from which the screen will be expanded when either H.ZOOM or V.ZOOM is
(Available in Custom selected as the expansion method. Options are CENTER and LEFT TOP.
Expansion mode only) CENTER: H.ZOOM expands the image from the centre outward to the sides of the screen.
V.ZOOM expands the image from the centre towards the top and bottom of the screen.
LEFT TOP: Indicates the set point for image expansion (TOP in V. Zoom, LEFT in
H.ZOOM). If the resolution does not fill out the screen, when expanding, the image will not
expand past the TOP or the LEFT of the screen. The image can be expanded past the
right and bottom edges of the screen.
Tag5 Gamma Selection Allows you to manually select the brightness level of grayscale. There are five selections:
NO CORRECTION, 2.2, OPTION, PROGRAMMABLE and CUSTOM.
NO CORRECTION: No Correction possible.
2.2: The value is fixed at 2.2.
OPTION: There are two ways of OPTION selection.
1: This setting is recommended for Video source. Gray area looks much brighter than
NO CORRECTION setting.
2: The value near DICOM gamma is set up in a factory and the luminosity difference
between gradations is changing into the legible state.
PROGRAMMABLE: The brightness of grayscale can be changed to your preference by
downloading the application software.
CUSTOM: Below items can be adjusted when CUSTOM is selected as the GAMMA
SELECTION setting.
Custom Value: The gamma value is selected from the rate of 0.5 to 4.0 by 0.1 steps.
When the COLOR CONTROL is sRGB, the value is fixed at 2.2 and NOT ADJUSTABLE.
Offset: The OFFSET digitally adjusts the black level after the signal is converted from
analog to digital.
Tag6 Color Control Colour Control Systems: Seven preset colour settings.
For preset settings 1, 2, 3, and 5, the following levels can be adjusted:
TEMPERATURE: Adjust the white temperature by increasing or decreasing this setting.
A lower colour temperature will make the screen reddish and a higher colour temperature
will make the screen bluish.
WHITE (White Balance): If TEMPERATURE needs further adjustment; the individual
R/ G/ B/ levels of the white point can be adjusted. To adjust the R/G/B levels, CUSTOM
must be showing as the TEMPERATURE selection.
HUE: Adjusts the hue of each colour*
1
. The change in colour will appear on screen and
the menu colour bars will show the amount of adjustment.
SATURATION: Adjusts the colour depth of each colour*
1
. Press the “RIGHT” button and
the colour vividness increases.
OFFSET: Adjusts the colour brightness of each colour*
1
. Press “RIGHT” button and the
colour Brightness increases.
*1: RED, YELLOW, GREEN, CYAN, BLUE and MAGENTA.
NATIVE, sRGB: Original colour presented by the LCD panel that is unadjustable.
PROGRAMMABLE: The colour tone that was set up with the downloaded application
software is reflected.
Tag7 Sharpness This is a digital capability for keeping a crisp image at all signal timings. It continuously
adjusts to maintain a distinct or soft image as you prefer, and is set independently
according to different timings. Press “Left” or “Right” to adjust.
DVI Selection This function selects the DVI input mode. When the DVI selection has been changed, you
must restart your computer. Press “Left” or “Right” to select.
AUTO: By using the DVI-D to DVI-D cable, the DVI SECTION is DIGITAL.
By using the D-SUB to DVI-A cable, the DVI SECTION is ANALOG.
DIGITAL: DVI digital input is available.
ANALOG: DVI analog input is available.