27
28
Operation
Power
This section describes how to select a computer or video source and how to
adjust the picture and sound.
General Controls
Before you turn on your MultiSync XP29 Plus/XM29 Plus monitor ensure that
the computer or video source is turned on.
1)To adjust:
1. Turn On The Monitor
The power button is on the front panel of the monitor. By turning this switch on,
the STANDBY/POWER indicator will turn to green and the monitor will
become ready to use. OSM is also usable from the front bezel.
After you press the POWER OFF button on the remote control, the monitor will
go into its standby mode and the STANDBY/POWER indicator will glow red.
2. Select The Computer Or Video Source
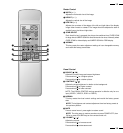
Press the “VIDEO 1” or “VIDEO 2” (VCR, document camera, or laser disc
player), or “RGB 1” or ” RGB 2”(computer) button on the remote control to
display the image. Or press the button on the front panel to select your video
source: “VIDEO 1”, “VIDEO 2”, “RGB 1”, or “RGB 2”.
NOTE 1: In the U.S.A. the standard video signal format is NTSC, therefore
make sure that the AUTO or NTSC is selected on OSM system control
menu. See page 40.
NOTE 2: Select the over scan mode for VIDEO display.
3. Adjust The Raster or The Picture Control.
You can adjust the raster such as the horizontal size, vertical size or side
pincushion correction, and the brightness and contrast of the image with the
remote control.
4. Turning Off The monitor.
Press the POWER OFF button on the remote control or press the POWER
button on the front panel.
Degaussing
The earth's magnetic field and other magnetic sources can magnetize a color
picture tube causing patches of impure colors. This monitor automatically
demagnetizes the picture tube for 5 seconds each time the monitor is switched
on. Sometimes during transportation a severe magnetic field can be
encountered which may require demagnetizing to clear the problem. Also, if
powered on for extended periods of time, magnetic fields can be produced by
the CRT itself, causing color impurities. In these cases, use the DEGAUSS
key once to demagnetize the picture tube. Pressing this key once
demagnetizes the picture tube for 5 seconds.
CAUTION: Please allow a minimum of 30 minutes to elapse between uses of
the DEGAUSS key, when not switching from mode to mode. Do not hold the
key down continuously to avoid decreasing the life of the degauss circuitry.
Using OSM Controls
NEC's new OSM, or On-Screen Manager, System offers the ultimate form of
monitor controls. Keys on the remote control unit or front bezel allow you to
easily navigate through menus and adjust controls.
OSM controls include extended controls such as Brightness, Contrast, Size,
Position, Pin cushion, Keystone, Vertical Linearity, Scan Select and other
OSM utilities. Adjustments are saved instantly. The currently addressed
control can be reset to factory settings by pressing the NORMAL key.
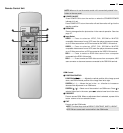
OSM keys on the remote control unit function as follows:
PROCEED : accesses the OSM controls. When an
adjustment item is selected, a press of this
button returns to its icon selection screen.
-in the color temperature: proceeds to the
control for RGB gain and bias.
EXIT : exits the OSM controls.
-in the RGB gain and bias: return to the color
temperature screen.
POSITION CONTROL up/down : selects one of the control items.
POSITION CONTROL-/+ : increase or decrease the settings level.
: selects a group icon at top of the OSM screen
when any one of them is highlighted without
any specific control selected.
NORMAL (RASTER/VISUAL) : resets the currently selected control to the
factory setting.
-when a specific group icon is highlighted, this
key resets all the specific controls settings or all
the settings.
-when a specific control is selected: this key
resets the selected adjustments.
NOTE: The NORMAL function is not valid in
the OSM Turn Off Time, Language Select
menus, and Volume Control.


