


NP643 IEEE 802.11g PC Card Adapter 9
YML786 Rev1
SOFTWARE INSTALLATION
This section will guide you through the driver and utility installation procedure for the
NP643.
Windows 98se/ME/2000/XP Utility and Driver Installation
1. Insert the Driver & Utility CD-ROM into the CD-ROM Drive. The driver and utility
setup menu should start up and install the driver. In some cases you may need to
install the software manually. This depends on your operating system settings. Go to
your Windows Start menu and choose Run, type “D:\Utility\Setup.exe” in the dialog
box (where D:\ will depend on where your CD-ROM drive is located) and click OK.
2. If you need to install the driver manually, refer your Windows Operating System (OS)
to the following CD-Rom directory path: D:\Driver\<Windows OS>\net5211.inf.
Note: (D:\ will depend on where the CD-ROM drive is located and
<Windows OS> will depend on the Windows OS you are using).
3. The Install Shield Wizard screen will appear. Click “Next” to continue.
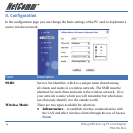
4. The installation program will help you setup the Wireless PC Card utility.
Note: Windows XP has its own Wireless Utility; you can either use the
utility of Windows XP or the provided utility.
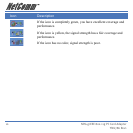
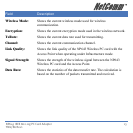
5. Once the Wireless PC Card Adapter is installed, you will find a new icon on the win-
dows task bar. The colour of the icon represents the strength of the wireless signal.