


NTI VIDMUX Series 2-Port DVI Video Switch
2
INSTALLATION
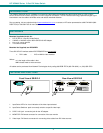
The VIDMUX is a Plug-and-Play device with no special configuration settings and easy installation steps:
1. Before connecting the VIDMUX to the video sources, make sure the video sources and the monitor are turned OFF.
WARNING! Damage may occur to the CPU if power is not disconnected before connecting or disconnecting
cables.
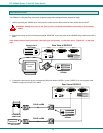
2. Connect the monitor to the DVI female port labeled “MONITOR” on the rear panel of the VIDMUX using a male-to-male DVI-I
cable.
Note: Some monitors need to have their video input type set manually. In this case, select “Digital DVI” as the input
type.
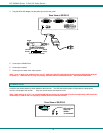
3. Connect the video sources to their corresponding DVI ports labeled “VIDEO 1" and/or "VIDEO 2" on the rear panel of the
VIDMUX using male-to-male DVI-I cables.
!
DVI Enabled
Monitor
Mating Face of
DVI Male
Mating Face of
DVI Female
5VDC
Rear View of SE-DVI-2
Monitor Video 2
Video 1
+
NTI
NETWORK
TECHNOLOGIES
INCORPORATED
Tel:330-562-70701275 Danner Dr
Aurora, OH 44202
www.networktechinc.com
R
Tel:800-742-8324
DVI-IS-xx-MM
Mating Face of
DVI Male
5VDC
Rear View of SE-DVI-2
Monitor Video 2
Video 1
+
HDTV Tuner
P
C
W
I
T
H
D
V
I
V
I
D
E
O
P
O
R
T
DVI-IS-xx-MM
NTI
NETWORK
TECHNOLOGIES
INCORPORATED
Tel:330-562-70701275 Danner Dr
Aurora, OH 44202
www.networktechinc.com
R
Tel:800-742-8324