


NTI VIDMUX Series 2-Port DVI Video Switch
3
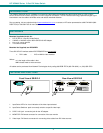
4. Plug the 5VDC AC adapter into the power jack on the rear panel.
5. Power up the VIDMUX first.
6. Power up the monitor.
7. Power up one or both of the video sources.
Note: If one or both of the video sources is a PC, make sure the LED associated with that source is illuminated while the
PC boots up. Otherwise the PC may not properly initialize with the connected monitor. See OPERATION below.
OPERATION
Press the input select buttons to switch between video sources. The LED above each button will illuminate to indicate which
source is connected to the monitor. Only one source can be connected at a time.
Note: While booting up a PC, it is recommended that the monitor be connected to the PC (corresponding LED should be
illuminated) in order for the PC to properly initialize with the connected monitor.
Barrel
(Inside
barrel)
(Outside
barrel)
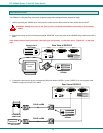
Power Connector
2.1 mm x 5.5 mm Female
5VDC @ 2.0A OUTPUT
5VDC
Rear View of SE-DVI-2
Monitor Video 2
Video 1
+
5 VDC
AC
ADAPTER
NTI
NETWORK
TECHNOLOGIES
INCORPORATED
Tel:330-562-7070
1275 Danner Dr
Aurora, OH 44202
www.networktechinc.com
R
Tel:800-742-8324
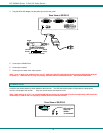
Front View of SE-DVI-2
NTI
R
Network Technologies Inc
VIDMUX
R
12
LED indicates
Source at
VIDEO 1
is connected