


- 4 -
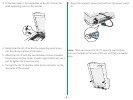
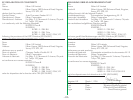
3. Fit the two holes in the hinge plate of the AF-10 over the
small supporting posts on the scanner.
4. Gently slide the AF-10 so that the supporting posts move
into the narrow sections of the holes.
5. Attach the AF-10 with the two lockdown screws provided.
Insert screws into the center of each hinge bracket and use a
coin to tighten the screws securely.
6. Connect the AF-10 interface cable to the connector on the
rear panel of the scanner.
7. Plug in the scanner’s power cord and turn the power switch
on.
Note: When you remove the AF-10, store the two lockdown
screws in the holes on the back of the unit, until they are needed
again.