


INSTALLATION
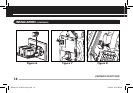
1. Locate the 4 pin speaker connector plugs (and remove them if they are plugged in).
2. Strip 1/4" of insulation from the end of each wire. Tightly twist the end of each wire until no frayed ends remain.
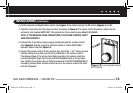
3. Use a small flathead screwdriver or your thumbnail to raise the locking tabs, exposing the holes on the removable
connector plug.
4. Insert each wire into the appropriate hole on the removable connector plug, and snap the locking tab down.
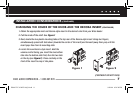
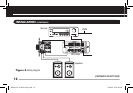
NOTE: MAINTAIN PROPER PHASING. CONNECT THE POSITIVE TERMINALS ON THE VOLUME CONTROL TO THE POSITIVE
TERMINALS ON THE AMPLIFIER AND SPEAKERS, AND CONNECT THE NEGATIVE TERMINALS ON THE VOLUME CONTROL
TO THE NEGATIVE TERMINALS ON THE AMPLIFIER AND SPEAKERS. SEE
FIGURE 3. TO HELP YOU AVOID IMPROPER
PHASING, THE CONNECTOR PLUG IS KEYED. INSERT THE SMOOTH SIDE OF THE CONNECTOR PLUG INTO THE SMOOTH
SIDE OF THE SOCKET. DON’T FORCE THE SCALLOPED SIDE OF THE CONNECTOR PLUG INTO THE SMOOTH SIDE OF THE
SOCKET. SEE FIGURE 6.
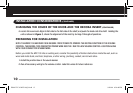
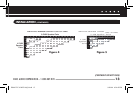
5. Locate the 2 pin voltage connector (see
Figure 8). Strip 1/4" of insulation from the end of each wire. Tightly
twist the end of each wire until no frayed ends remain and insert each wire into the appropriate hole on the
connector. Use a small flathead screwdriver to tighten the screws in place. Maintain correct polarity when
making connections.
NILES AUDIO CORPORATION – 1-800-BUY-HIFI
11
(CONTINUED ON NEXT PAGE)
DS00317C-0 MVC100_R.indd 13 9/20/06 4:28:40 PM