


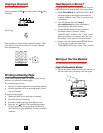

Programming Checklist
See your handbook for instructions for how to enter:
❒ Your fax number and identification—required by
law: Page 23
❒ Your voice telephone number: Page 23
❒ Date and time—required by law: Page 21
❒ Fax mode: Page 22
❒ One Touch dial keys: Page 30
OKIFAX 5300 Plus: 15 available
OKIFAX 5600 Plus: 30 available
❒ Auto Dial numbers: Page 32
OKIFAX 5300 Plus: 64 available
OKIFAX 5600 Plus: 99 available
❒ Groups of programmed numbers: Page 53
OKIFAX 5300 Plus: 10 available
OKIFAX 5600 Plus: 20 available
6
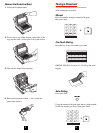
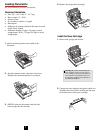
3. With the ridged side facing up and the blue lever
on your right, insert the toner cartridge into the
image drum unit, left end first.
1
A
B
C
2
D
E
F
3
G
H
I
4
JK
L
5
M
N
6
P
R
S
7
T
U
V
8
W
X
Y
9
*
O
Q
Z
0
#
AUTO REC
SEARCH
SELECT
FUNCTION
AUTO DIAL
HYPHEN
REDIAL
COPY
HOOK
V. REQUEST
PHOTO
EX FINE
FINE
STD
LIGHT
NORMAL
DARK
ALARM
STOP
START
4. Push the lever forward to secure the cartridge.
1
ABC
2
DEF
3
GHI
4
JKL
5
MN
6
PRS
7
TUV
8
WXY
9
*
OQZ
0
#
AUTO
REC
SEARCH
SELECT
FUNCTION
AUTO DIAL
HYPHEN
REDIAL
CO
PY
HOOK
V. REQ
UEST
PHO
TO
EX FINE
FINE
STD
LIGHT
NO
RM
AL
DARK
ALARM
STO
P
START
5. Close the copy stacker—push down until you hear
both sides click into place.
1
ABC
2
DEF
3
GHI
4
JKL
5
MN
6
PRS
7
TUV
8
WXY
9
*
OQZ
0
#
AU
TO
REC
SEAR
C
H
SELECT
FUNCTION
AU
TO
D
IAL
H
YPH
EN
RED
IAL
C
O
PY
H
O
O
K
V. REQ
U
EST
PH
O
TO
EX FINE
FIN
E
STD
LIG
H
T
N
O
RM
AL
DAR
K
ALARM
STO
P
START
6. Close the document table.
1
ABC
2
DEF
3
GHI
4
JKL
5
M
N
6
PRS
7
TUV
8
W
XY
9
*
OQZ
0
#
AUTO REC
SEARCH
S
E
L
E
C
T
F
U
N
C
T
IO
N
AUTO DIAL
HYPHEN
REDIAL
COPY
HOOK
V. REQUEST
PHOTO
EX FINE
FINE
STD
LIGHT
NORMAL
DARK
ALARM
STOP
START
5
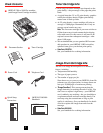
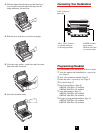
Connecting Your Fax Machine
LINE: Connect to
phone line.
TEL 1, TEL 2: Connect
to optional handset or
to answering machine.
POWER: Connect
power cord to
OKIFAX first, then
to grounded outlet.