


SY-P4I865PE Lite DRAGON 2
Quick Start Guide
13
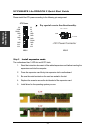
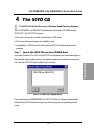
Hardware
Installation
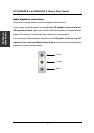
Power On/Off: PWRBT
Connect your power switch to this header (momentary switch type).
To turn off the system, press this switch and hold down for longer than 4 seconds.
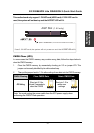
ATX 12V Power Supply: ATX PW
Attach the ATX 12V Power cable to three connector. (This motherboard requires an ATX 12V power
supply, an AT or ATX power supply can NOT be used.)
When using the Power-On by Keyboard function, please make sure the ATX power supply is able to
provide at least 720mA on the 5V Standby lead (5VSB).
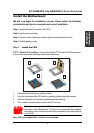
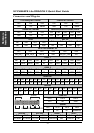
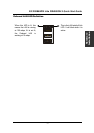
Power Supply
The power supply connector is the last connection to be made while installing a
motherboard. This motherboard requires an ATX 12V compliant power supply (For P4
system). An AT or ATX power supply cannot be used.
Steps:
1. Connect the 20 pin connector to the ATX power connector. See FIG. 1.
2. Connect the 4 pin connector to the +12V power connector. See FIG. 2.
Note1: The presence of the +12V power connector indicates that a power supply is
ATX 12V; the absence of the +12V power connector indicates that a supply
is ATX.
Note2: When using the Power-On by Keyboard function, please make sure the ATX
12V power supply is able to provide at lease 720mA on the 5V Standby lead
(5VSB).
Note3: The minimum recommended wattage is 350 watts for a fully configured
system. The system might become unstable if power supply is to small.