


3
Erasing les/folders
48
EN
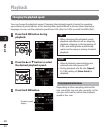
Erasing files/folders
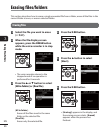
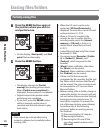
Partially erasing files
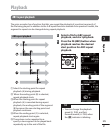
3
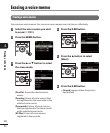
Press the
ERASE
button again at
the position where you wish to
end partial erase.
• On the display, [Start point] and [End
point] flashes alternately.
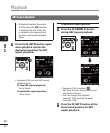
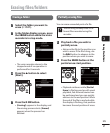
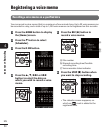
4
Press the
ERASE
button.
• The display changes to [Partial
erasing!] and erasing process starts.
When [Partial erase completed] is
displayed, the procedure is completed.
• Playback stops at the position where
partial erase was completed.
• If you don’t press the ERASE button
within 8 seconds, partial erase is
canceled and the unit returns to play
back status.
NOTE
• Files cannot be restored after being
erased, so please check carefully before
erasing a file.
• When the SD card is set to write-
protected, [SD Card Protected] is
displayed. To erase files, cancel SD card
write protection (☞P.19).
• When an SD card is inserted in the
recorder, be sure to confirm that the
recording media used is the [Internal
memory] or [SD card] so there is no
mistake about where files are stored
(☞
P.71).
• Locked files and read-only files cannot
be erased (☞
P.66).
• You cannot erase [Recorder] ([Folder
A] to [Folder E]), [Music], and
[Podcast], which are preset in the
recorder.
• [Music] folder subfolders other than
the [Music] can be erased.
• [Podcast] folder subfolders other than
the [Podcast] can be erased.
• If there is a file that cannot be
recognized by the recorder, the file and
the folder which contains that file will
not be erased. The voice recorder must
be connected to a PC to erase these
files and folders.
• Before erasing a file or folder, charge or
replace the battery to ensure it will not
run out before the process has finished.
Erasing processes can take over 10
seconds to complete. To prevent the
risk of damage to data, never attempt
to perform any of the following
processes before an erasing process
has finished:
1 Disconnecting the AC adapter
2 Removing the battery
3 Removing the SD card (if the
recording media has been set to
[SD card]).