


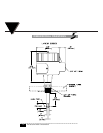
FINAL INSTALLATION
7
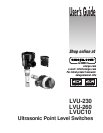
For Ultrasonic Point Level Switches
3
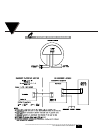
CALIBRATION PROCEDURE
(IF REQUIRED, OTHERWISE DO NOT ADJUST THE POTENTIOMETER -
LVUC10)
After the installation is complete, the system must be calibrated for the proper
operation.
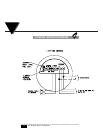
1. Connect the sensor cable to electronics at Jacks J1 and J2.
2. Connect power as per wiring diagram.
3. Turn the power on.
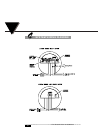
4. Allow the liquid or sludge to rise above the sensing point, adjust the poten-
tiometer clockwise, until the relay is energized or output will switch to
20.0+1.0 mA. Turn the potentiometer one more turn clockwise.
5. Allow the liquid or sludge to fall below the sensing point, relay should be de-
energized or output will switch back to 4.0+1.0 mA. If not, turn the poten-
tiometer counter clockwise until the relay is de-energized. Turn the poten-
tiometer counter clockwise one half turn.
6. Repeat Steps 4 and 5 for a final adjustment.
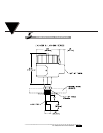
8. Unit is now calibrated. When the liquid level is above the sensing point, the
relay will be energized or output will switch to 20.0±1.0 mA. When the liq-
uid level is below the sensing point, the relay will be de-energized or output
will switch back to 4.0±1.0 mA.