


4
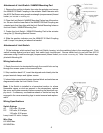
Attachment of Limit Switch / NAMUR Mounting Pad
1. Remove the position indicator from atop the actuator and secure
the NAMUR 30 Shaft Coupling to the actuator Shaft Extension with
the #6-32 Set Screw using a medium strength (nonpermanent) thread
locker
(not included in mounting kit).
2. Place the Limit Switch / NAMUR Mounting Pad on top of the actua-
tor. Be sure that the lower flats of the NAMUR 30 Shaft Coupling are
oriented such that they align with the Limit Switch Mounting holes on
the Limit Switch / NAMUR Mounting Pad.
3. Fasten the Limit Switch / NAMUR Mounting Pad to the actuator
using the (2) Mounting Bracket Screws.
4. Slide the position indicator over the NAMUR 30 Shaft Coupling
until it ‘snaps’ into place just above the bracket.
Attachment of Limit Switch
1. Fit the bushings, which extend from the Limit Switch housing, into the matching holes in the mounting pad. Push
switch housing against pad and verify that switch body touches pad. Secure switch body to pad with two #10-24
setscrews using a medium strength (nonpermanent) thread locker (not included in mounting kit). Note: Hex wrench sup-
plied with Mounting Kit.
Wiring Instructions
1. Route the wire to be terminated through the conduit hub and up
through the access space to the terminal block.
2. Strip insulation back 1/4”, insert the stripped ends directly into the
proper terminal clamps and tighten screws.
3. Internal interconnections between terminal-block and switches are
diagrammed inside the Limit Switch Cover.
Note: If the Switch is installed in a hazardous location i.e. where
flammable vapors or dust are present in the atmosphere, replace
the cover and tighten securely before connecting the electrical sup-
ply circuit. If necessary, a screwdriver shank or similar tool may be
engaged in the cover wrenching lugs to assist removal and replace-
ment.
Wiring Specifications
Switch Ratings
AC 250 volts; 10 amps
DC 250 volts; 0.25 amps
125 volts; 0.50 amps
Lamp Load 125 volts; 5 amps
Wire Size
#12 AWG Max.
#24 AWG Min.