


UK
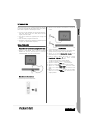
Setting up your DVD player -
11
ENGLISH
MP3 PLAYBACK
One MP3 disc can contain up to 10 hours of music.
The directory and play mode will only display when SMART NAVI in
the Preferences page is set as WITH MENU.
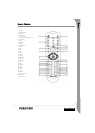
1. Use the navigation arrow and O
OK buttons to browse through the
menu.
2. To go back to a higher-level menu, press the folder icon.
When display is in stop mode, you can use the R
Repeat and RRandom
buttons to select a display mode.
3. Programmed playback
> Press the PProgram button to enter Program mode.
> Use the Numeric buttons to select tracks. When finished, press
Stop .
> Press the P
Play button to play the program.
> Set another play mode to exit programmed playback.
PICTURE CD PLAYBACK
Playback modes
Normal
When a directory is selected in the play mode window, each picture
in the current directory will be displayed consecutively in a slide
show fashion and will be scaled to fit in the TV screen. Twelve slide
show transition modes are provided. Use the PPBC button to select:
Mode 0: no special transition effect (by default)
Mode 1: wipe from top to bottom
Mode 2: wipe from bottom to top
Mode 3: wipe from top/bottom to centre
Mode 4: wipe from centre to top/bottom
Mode 5: vertical blind
Mode 6: wipe from left to right
Mode 7: wipe from right to left
Mode 8: wipe from left/right to centre
Mode 9: wipe from centre to left/right
Mode 10: wipe from edge to centre
Mode 11: horizontal blinds
Mode 12: random
With the PBC button you can set transition effects for the slide
show. The last selection will remain in memory.
Press the P
Pause button to freeze display and the N
Next or
Previous buttons to browse through pictures. To resume the slide
show, press the EEnter/OK or PPlay button.
Image Rotation
There are four modes to rotate a picture: Invert, Mirror, Left, and
Right. These operations are allowed only when a picture is being
displayed normally and will be cancelled automatically when a new
picture is displayed. The arrow button is used to select the different
rotation modes:
Up button: Invert/Normal
Down button: Mirror/Normal
Left button: Turn left
Right button: Turn right
Zoom
Both ZOOM in/out and Zoom pan functions are available for JPEG
pictures. With the ZZoom button, you can zoom in or out for JPEG
pictures. An OSD message will indicate the current ratio.
If zoom mode is on, the FFast Forward and RRewind buttons
are used to control the ratio of zoom in/out. With ZOOM mode off,
a picture is scaled to fit the screen.
Note: during ZOOM function, slide show transition and
image transformation are disabled.
Thumbnails
The SSub-menu button is used to enable JPEG thumbnail mode. Up to
nine thumbnail pictures will be displayed. With the NNext and
Prev buttons you can display the next and previous nine pictures
in the current directory. Each of the nine pictures will be numbered
from 1 to 9.
By pressing a numeral button the corresponding picture will be
enlarged to full-screen, and the thumbnail mode will be cancelled.
Music Slide Show
With the Step button in the fully stopped state you can enter or exit
the music slide show. With the AA-B button you can select an MP3
file as background audio.
Note: during Music Slide Show, image transformation,
zoom and thumbnails are not allowed.
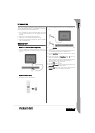
USB DEVICE CONNECTION
To connect a USB mass storage device to the DVD player:
1. Insert your USB device into the USB socket on the front panel.
2. If the USB mode does not launch automatically, press the DVD/
USB button to switch to USB mode.
To disconnect:
1. Remove the USB device to quit the USB mode.
Warning: Do not remove the USB device until the file
transfer is complete. Failure to do so may result in the
corruption or loss of file(s).
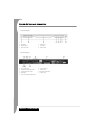
USB DEVICE FUNCTIONS
Use the SMART NAVI menu to Rename, Move/Copy, Delete and
display Properties. To open the SMART NAV 1 menu press the
DVD/USB button and select either DVD or USB from the drop down
list.
Copy files from a disc to a USB mass storage device
1. Press the DVD/USB button and select USB to open the SMART
NAV1 menu.
2. In the SMART NAV1 menu, press the Up/Down buttons to high-
light the target folder on the USB disc you wish to copy the files
to.
3. Press the Select button to select the folder.
4. Press the DVD/USB button to open the source disc menu.
5. In the disc menu, press the Transfer button to open the sub
menu.
6. Press the Up/Down buttons to highlight the SELECT option and
press OK.
7. Press the Up/Down buttons to highlight the file or files you wish
to copy.
8. Press the OK button to select each file in turn. The selected files
will change colour. If you make a mistake press the OK button
repeatedly until the file is deselected.
9. After your selections have been made, press the Stop button.