


RSA Data Security, Inc. makes no representations concerning either the merchantability of this software or
the
suitability of this software for any particular purpose. It is provided "as is" without express or implied warranty
of any kind.
These notices must be retained in any copies of any part of this documentation and/or software.
Installing the Maintenance Console
Note
• Make sure to install and use the latest version of the Maintenance Console.
• To install or uninstall the software on a PC running Windows XP Professional, you must be logged in
as a user in either the "Administrators" or "Power Users" group.
• To install or uninstall the software on a PC running Windows Vista Business, you must be logged in
as a user in the "Administrators" group.
• Product specifications, including text displayed by the software, are subject to change without notice.
1. Copy the setup file of the Maintenance Console to your PC.
2. Double-click the setup file to run the installer.
3. Follow the on-screen instructions provided by the installation wizard.
Starting the Maintenance Console and Assigning the Basic Items (Quick
Setup)
When you start the Maintenance Console with the Installer Level Programmer Code and connect to the PBX
for
the first time after initialisation (with the factory default setting), Quick Setup will launch automatically. During
Quick Setup, you will set up the basic items. For details about the basic items, refer to "2.3.4 Quick Setup" in
the Feature Guide.
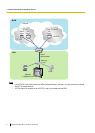
1. Connect the PC to the PBX with an Ethernet straight cable or RS-232C cross cable.
2. Start the Maintenance Console from the Start menu.
3. "Information before programming" appears.
a. Carefully read this important additional information, which includes updates to this and other
manuals.
b. Click OK to close this window.
4.
a. Enter the Installer Level Programmer Code (default: INSTALLER).
b. Click OK.
5. Click Connect.
6.
a. Select your PBX model from PBX Model.
b. Select the LAN or RS-232C tab, depending on the type of PC connection with the PBX.
c. Specify the settings as required.
Note
When connecting to the PBX for the first time selecting LAN, the IP Address and Port
Number must be set to 192.168.0.101 and 35300 respectively.
d. Enter the system password for installer (default: 1234).
e. Click Connect.
Programming Manual for Virtual SIP Trunk Card 13
2.1.1 Installing and Starting the Maintenance Console