


Getting Started
Setting up
ENGLISH - 15
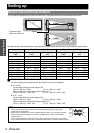
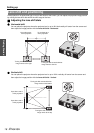
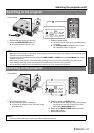
You can use the projector with any of the following 4 projection methods. To set the desired method in the projector,
See “INSTALLATION” on page 44.
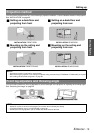
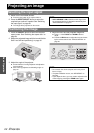
You can screw up/down the front leg adjusters to control the angle of the projector for adjusting the throwing angle.
See “Positioning the image” on page 22.
Projection method
J Setting on a desk/floor and
projecting from front
J Setting on a desk/floor and
projecting from rear
INSTALLATION: FRONT/DESK INSTALLATION: REAR/DESK
J Mounting on the ceiling and
projecting from front
J Mounting on the ceiling and
projecting from rear
INSTALLATION: FRONT/CEILING INSTALLATION: REAR/CEILING
NOTE:
• A translucent screen is required for rear projection.
• When mounting the projector on the ceiling, the optional ceiling mount bracket (ET-PKE2000, ET-PKE1000S) is required.
• See “Ceiling mount bracket safeguards” on page 56.
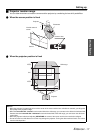
Front leg adjusters and throwing angle
NOTE:
• Heated air comes out of the air exhaust port. Do not touch the air exhaust port directly.
• If keystone distortion occurs, see “KEYSTONE” on page 39.
• Screw up the front leg adjusters, and an audible click will be heard as the limit.