


60
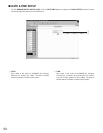
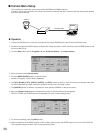
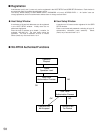
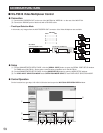
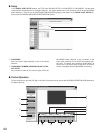
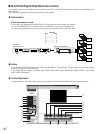
q CAMERA SELECT (Left window panel)
To select a camera (camera 1 to 16) connected to the
WJ-FS616 Video Multiplexer. The image of the select-
ed camera is displayed in spot mode.
w PRESET SELECT (Left window panel)
To move the combination camera (option) connected to
the WJ-FS616 to any of 8 preset positions.
e ALARM LIST
Any image before or after alarm input can be temporar-
ily stored in the internal memory of the WJ-NT104. For
alarm display see ALARM LIST on page 37.
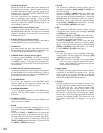
r CAMERA SELECT (Bottom window panel)
To select a camera (camera 1 to 16) connected to the
WJ-FS616. Select a camera number, and then click
[SET] to apply it. The image of the selected camera is
displayed in spot mode.
t MULTISCREEN SELECT
Clicking this button repeatedly will switch the screen as
follows:
4 → 7 → 9 → 10 → 13 → 16→ 4 screen segments
y PRESET SELECT (Bottom window panel)
To move the combination camera (option) connected to
the WJ-FS616 to any of 64 preset positions. Select a
preset position number, and then click the [SET] button
to move the camera to the position.
u ALARM ALL RESET
To reset all alarms activated in the Video Multiplexer,
and return it to normal condition.
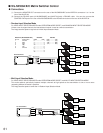
i PAN/TILT
Clicking anywhere on the live image moves the con-
nected combination camera (option) up and down, or
to the right and left. The camera pan/tilt angle
decreases as the point clicked moves closer to the
image center. Clicking the image center will not move
the camera. Zooming does not change the camera
pan/tilt angle. Click the image repeatedly to move the
camera to the desired position. You cannot pan or tilt
the camera continuously by dragging on the live
image.
o ZOOM
The connected combination camera (option) can be
zoomed by clicking the [TELE] or [WIDE] button under
ZOOM.
Clicking the [TELE] or [WIDE] button will operate the
camera in telescopic or wide-angle mode for a speci-
fied time, after which the mode is released automatical-
ly. These modes cannot be retained by keeping the
[TELE] or [WIDE] button depressed. You need to click
the [TELE] or [WIDE] button again.
!0 FOCUS
The connected combination camera (option) can be
focused by clicking the [FAR], [NEAR] or [AUTO] but-
ton under FOCUS.
Clicking the [FAR] or [NEAR] button will operate the
camera in focusing mode for a specified time, after
which the mode is released automatically. Clicking the
[AUTO] button will automatically focus the image on
the screen. Focus control cannot be retained by keep-
ing the [FAR] or [NEAR] button depressed. You need
to click the [FAR] or [NEAR] button again.
!1 IRIS
The connected combination camera (option) can be
controlled to close or open the iris by clicking the
[CLOSE] or [OPEN] button under IRIS.
Clicking the [OPEN] or [CLOSE] button will open or
close the camera iris for a specified time, after which
the operation is released automatically.
Clicking the [RESET] button on the screen will reset
the iris of the displayed camera to the factory default
setting. Iris control cannot be retained by keeping the
[OPEN] or [CLOSE] button depressed. You need to
click the [OPEN] or [CLOSE] button again.
!2 AUTO PAN
The auto pan status of the connected combination
camera (option) can be changed by clicking the [ON]
or [OFF] button under AUTOPAN.
Note: Note: When LOCAL is selected in the camera
setup menu, auto pan is released automatically
after 1 minute. When REMOTE is selected, auto
pan will not be released automatically.
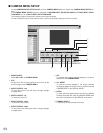
!3 Image Display
The image output from the MULTISCREEN OUT con-
nector of the video multiplexer connected to the WJ-
NT104 is displayed.