


5.0 OPERATION
Once the Model 1090 is properly configured and installed, it should
operate transparently. This sections describes power-up, reading the
LED status monitors, and using the built-in loopback test modes.
5.1 POWER-UP
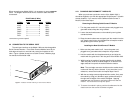
Before applying power to the Model 1090, first be sure that you
have read Section 4.3, and that the your power source matches the
power rating shown on the bottom label of the Model 1090.
Failure to
do so could result in damage to the unit and connected
equipment, and may constitute a fire hazard. If your Model
1090 is AC powered, plug the AC power cord into both the Model 1090
and the AC outlet. Then power-up the unit using the rear power switch.
If your Model 1090 is DC powered, and has been connected to the DC
power source according to the instructions in Section 4.3, turn on the
DC power supply and then power-up the unit using the rear power
switch.
5.2 LED STATUS MONITORS
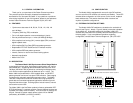
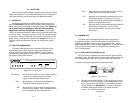
The Model 1090 features seven front panel LEDs that monitor
transmit data, receive data, request to send, carrier detect, data
terminal ready, test modes and error conditions. Figure 5 (above)
shows the front panel location of each LED. Following Figure 6 is a
description of each LED’s function.
TD and RD - Will glow red to indicate an idle condition of Binary
1 data on the respective terminal interface
signals. Green indicates Binary“0 data.
RTS - Will glow green to indicate that the Request to
Send signal from the terminal is active.
CD- Will glow red if no carrier signal is being received
from the remote modem. Green indicates that the
remote modem’s carrier is being received.
13
DTR - Will glow green to indicate that the Data Terminal
Ready signal from the terminal is active.
ER - Will glow red to indicate the likelihood of a Bit Error
in the received signal. During the 511 or 511/E
test, ER will flash to indicate that the Test Pattern
Detector has detected a bit error.
TM - Will glow green to indicate that the Model 1090 has
been placed in Test Mode. The unit can be
placed in test mode by the local user or by the
remote user.
5.3 DIAGNOSTICS
The Model 1090 is equipped with three sets of diagnostics to
evaluate the condition of the local and remote units, as well as the
twisted pair link between them: local analog loopback (LAL), remote
digital loopback (RDL), and local digital loopback (LDL) according to the
CCITT V.54 Standard, and bit error rate BER test according to the
CCITT V.52 Standard.
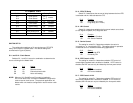
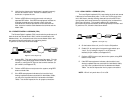
5.3.1 LOCAL ANALOG LOOPBACK (LAL)
The Local Analog Loopback (LAL) test checks the operation of the
local Model 1090. Any data sent to the local Model 1090 in this test will
be echoed (returned) back to the user device (see Figure 6, below)..
To perform an Analog Loopback test, follow these steps:
A. Activate Local Analog Loopback. This may be done in one of
two ways: First, by moving the front panel toggle switch UP to
Local. Second, by raising signal LL on the terminal interface
(for pin numbers, see Appendix D). Once LAL is activated,
the Model 1090 transmit output is connected to its own
receiver. The TM LED should be lit.
(continued)
14
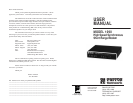
Model 1090
KiloModem PS
High Speed Sync. Short Range Modem
RDTD RTS CD DTR ER TM
Test Modes
Local -
Normal -
Remote -
- 511E
- Normal
- 511
Figure 5. Model 1090 Front Panel
1090
10
Figure 6. Local Analog Loop