


Bootloader 36
SmartNode 4552 & 4562 Getting Started Guide 4 • Initial configuration
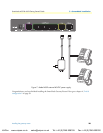
configuration is required, only the LAN and WAN Ethernet connections should be made to access the
Internet immediately.
• PPPoE. The SmartNode establishes the connection with the Internet using PPPoE. This is most commonly
used when the SmartNode is connected to a DSL bridge, or a DSL router that is configured in bridge mode
(most routers are capable of this).
Enter the DSL credentials (username and password) on the SmartNode and click on the Apply button.
• User Defined Address. The SmartNode uses an existing internet connection which does not provide an
upstream DHCP server. In this case, you need to set the IP address, subnet mask, default gateway and
DNS servers manually.
- IP Address—The IP address of the WAN Ethernet port.
- IP Mask—The mask for the WAN port’s IP address.
Click on the Apply icon to apply the new configuration.
• Default Gateway—This is the IP address of the upstream router. Click on the Apply icon to apply the new
configuration.
• DNS/DynDNS—In the Configuration Menu, go to DNS/DynDNS. Enter the IP addresses of the DNS
servers and Apply the new settings.
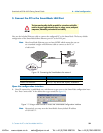
Figure 14 on page 35 shows the third case—User Defined Address configuration of connectivity parameters.
In this example the SmartNode’s WAN IP address is 172.16.44.55 with an IP Mask of 255.255.255.0. The
Default Gateway is 172.16.44.1.
Note Be sure to return to the Home configuration page to save the new configura-
tion in non-volatile memory.
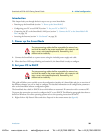
Bootloader
The bootloader ensures that basic operations, network access, and downloads are possible in case of interrupted
or corrupted application image downloads. It offers console access to the Bootloader and the capability for
downloading application images (e.g. SmartWare) via the serial link of the console.
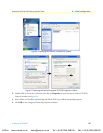
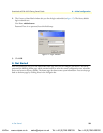
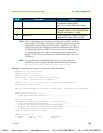
Start Bootloader
To start the Bootloader, power on the SmartNode while pressing the reset button. Open a Telnet session to the
SmartNode via one of the Ethernet interfaces, or open a CLI session via the console port (if available on the
SmartNode). The login display will appear. Using the credentials admin / patton , log in to the SmartNode.
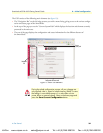
The “advanced GUI” leads you to the full universe of Smart-
Node configuration parameters. There are many more things
that can be configured than you are presented on the “basic
GUI” pages you see when the system starts. Be aware that
configuration is quite a bit more complicated and requires
some know-how about VoIP and the SmartNode configuration
concepts. We recommend familiarizing yourself with the
SmartWare Software Configuration Guide
before switching
to the advanced mode.
VoIPon www.voipon.co.uk sales@voipon.co.uk Tel: +44 (0)1245 808195 Fax: +44 (0)1245 600030