


8 of 11
ISSUED: 1-11-08 SHEET #: 055-9495-2 10-16-08
Visit the Peerless Web Site at www.peerlessmounts.com
For customer care call 1-800-865-2112 or 708-865-8870.
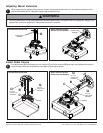
Installing Projector Mount
4
CEILING INSTALLATION
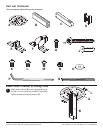
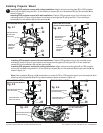
Installing PRS projector mount with wall installation: Position PRS projector mount (not included) to the
orientation shown in figure 4.3 and attach to horizontal mounting plate (F) using two M5 x 16 mm socket pin
screws (G), four flat washers (O) and two locknuts (N).
Installing PRS projector mount with ceiling installation: Attach vertical mounting plate (E) to PRS projector
mount (not included) using two M5 x 16 mm socket pin screws (G), four flat washers (O) and two locknuts (N) as
shown in figure 4.4.
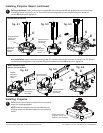
Note: Placing washer (O) and nut (N) combination on inside of PRG or PRS projector mount (not included) first while
attaching mounting bracket (E or F) can make installation easier as shown in figure 4.5.
N
O
N
O
E
G
G
F
ARROW
INDICATES
FRONT OF
MOUNT
ARROW
INDICATES
FRONT OF
MOUNT
CEILING INSTALLATION
PRG PROJECTOR
MOUNT (NOT
INCLUDED)
PRG PROJECTOR
MOUNT (NOT
INCLUDED)
N
O
G
F
PRS PROJECTOR MOUNT
(NOT INCLUDED)
HOLE INDICATES
FRONT OF MOUNT
WALL INSTALLATION
(EXCEPT FOR EXC MODELS)
HOLE INDICATES
FRONT OF MOUNT
N
O
G
E
PRS PROJECTOR MOUNT
(NOT INCLUDED)
fig. 4.1
fig. 4.2
fig. 4.3
fig. 4.4
fig. 4.5
PRS PROJECTOR MOUNT
(NOT INCLUDED)
PLACE WASHER (O) AND
NUT (N) COMBINATION
FIRST
N
O
WALL INSTALLATION
(EXCEPT FOR EXC MODELS)
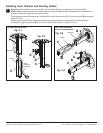
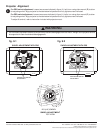
Installing PRG projector mount with ceiling installation: Attach vertical mounting plate (E) to PRG projector
mount (not included) using two M5 x 16 mm socket pin screws (G), four flat washers (O) and two locknuts (N) as
shown in figure 4.1.
Installing PRG projector mount with wall installation: Position PRG projector mount (not included) to the
orientation shown in figure 4.2 and attach to horizontal mounting plate (F) using two M5 x 16 mm socket pin
screws (G), four flat washers (O) and two locknuts (N).
O
O
O
O