


ISSUED: 09-09-02 SHEET #: 054-9122-3 11-11-03
Visit the Peerless Web Site at www.peerlessindustries.com For customer service call 1-800-729-0307 or 708-865-8870.
3 of 5
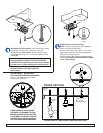
G
H
A
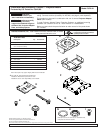
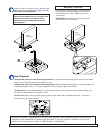
ceiling plate
(sold separately)
extension
column (sold
separately)
Extension column applications only:
Insert end of extension column into threaded fitting in
ceiling plate. Tighten securely - four or five complete
turns. Align slot in extension column with one of the
small holes in the side of the threaded fitting. Insert
and tighten one M5 x .8 x 10mm socket pin screw ( I )
into hole to lock extension column to threaded fitting.
Tighten screw allen wrench (D).
WARNING: For safety, extension column must be
locked to threaded fitting with screw ( I )!
Attach projector mount ceiling plate (A) with fiber
washer (G) and retaining collar (H). Tighten retaining
collar securely, four or five complete turns, aligning
one hole in the side of retaining collar with slot in the
end of extension column. From inside insert and
tighten one M5 x .8 x 10mm socket pin screw ( I ) into
hole in retaining collar. Tighten screw with allen
wrench (D).
Note: You may need to thread the socket pin screw
from the outside first (approximately 3 turns) to
loosen any buildup that may be on the threads.
WARNING: For safety, retaining collar must be
locked to extension column with screw ( I )!
I
slot
threaded
fitting
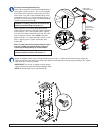
J
A
Attach roll adaptor bracket (J) to ceiling plate (A) using four M6 x 1 x 20mm socket head security screws (C).
Tighten using 4mm allen wrench provided. Next attach main bracket (F) using remaining fasteners (C). Tighten
using 4mm allen wrench provided.
IMPORTANT: Do not lose or dispose of allen wrench.
It will be required to attach the Projector Adapter Plate.
NOTE: Arrow indicates front of main bracket (F).
C
I
F