


ISSUED: 09-09-02 SHEET #: 054-9122-3 11-11-03
Visit the Peerless Web Site at www.peerlessindustries.com For customer service call 1-800-729-0307 or 708-865-8870.
5 of 5
ceiling
(cutaway)
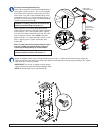
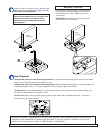
Position four tabs in interface bracket (K) behind four
tabs in base unit. Slide forward to engage latch. BE
SURE THAT LATCH IS ENGAGED!
WARNING:
Do not lift more weight than you can handle! Use
additional man power or mechanical lifting
equipment to safely handle placement of the
video projector!
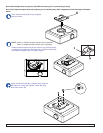
Lock the latch by tightening M6 x 1 x 20mm socket
head security screw (C) through hole in base unit,
into threaded hole in latch. Tighten using 4mm
allen wrench.
IMPORTANT: Allen wrench is your key for projector
removal. Store it in a safe place.
SECURITY OPTION
Peerless offers several Projector Mounts to fit various video projectors. New Projector Mounts are continually being
developed to meet the demands of a growing projector market. To find out if a mount is available for your particular
projector call Peerless customer service at 1-800-729-0307 or 708-865-8870.
ceiling
(cutaway)
K
latch
C
latch
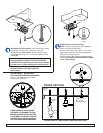
To adjust Yaw (swivel) for flush mounting applications: Loosen wood screws until projector mount can be rotated.
Rotate mount to desired position and retighten screws.
To adjust Yaw (swivel) for extension column applications: Rotate mount to desired position. Insert and tighten one
remaining socket pin screw ( I ) into tab in projector mount ceiling plate (A) as shown below.
To adjust pitch (forward and backward tilt), loosen the two screws on each side of the main bracket assembly (F).
Tilt mount to desired position and tighten screws.
To adjust roll (side to side tilt), loosen the two screws on each side of the roll adapter bracket (J). Tilt mount to
desired position and tighten screws.
Final Alignment
I