


11 of 14
ISSUED:07-25-11 SHEET #: 125-9225-1
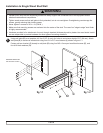
FRONTOFPROJECTOR FRONTOFPROJECTOR
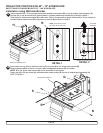
FIGURE 9.2
FIGURE 9.1
FRONTOFPROJECTOR
FRONTOFPROJECTOR
FRONTOFPROJECTOR
FRONTOFPROJECTOR
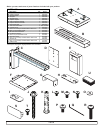
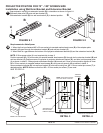
Installation using Wall Arm Bracket and Extension Bracket
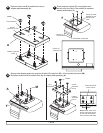
PROJECTORCABLES
11
12
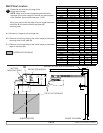
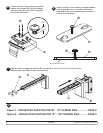
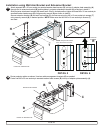
AttachexposedM5x20mmsocketpinserratedwasherheadscrews(R)intotopofadapterplateassembly(A)
throughslotinextensionbracket(B)andkeyholesinprojectorattachmentbracket(H)asshownindetail5.
Slideprojectorattachmentbracket(H)towardwall.OnceinlockedpositiontightenallthreeM5x20mmsocketpin
serratedwasherheadscrews(R)usingsecuritywrench(Q)asshownindetail6.
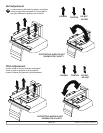
Secureextensionbracket(B)intowallarmbracket(C)andsecureusingfourM5x10mmsocketpinscrews(T)
usingsecuritywrench(Q)indesiredposition.NOTE: MakesurethatfourM5x10mmsocketpinscrews(T)
areused.
TIGHTEN
SCREWS
G
B
C
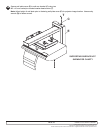
Routeprojectorcablesasshown.Usetwocablemanagementbrackets(G)asneeded.
FastentwoM5x20mmsocketpinserratedwasherheadscrews(R)intotopofadapterplateassembly(A).
R
NOTE: Verifythatallscrews
areinthecenteroftheslot.
T
DETAIL 3
DETAIL 4
DETAIL 5
DETAIL 6
B
H
A
R
R