


5 of 14
ISSUED:07-25-11 SHEET #: 125-9225-1
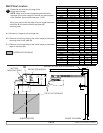
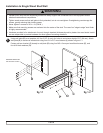
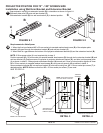
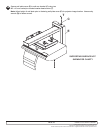
Usingwallplate(D)asatemplate,drillfour5/32"(4mm)dia.holestoaminimumdepthof2.5"(64mm).Attach
wallplate(D)tocentersofwoodstudsusingfour#14x2.5"woodscrews(J)showningure1.1.
Fastenwallarmbracket(C)looselytowallplate(D)usingfourM5x8mmpanheadblackscrews(P),and
four#10blackwashers(O).
Installation to Single Wood Stud Wall
1
P
O
D
D
J
DIAMONDINDICATES
TOPOFWALLPLATE
C
g1.1 g1.2
• Installermustverifythatthesupportingsurfacewillsafelysupportthecombinedloadoftheequipmentandall
attachedhardwareandcomponents.
• Tightenwoodscrewssothatwallplateisrmlyattached,butdonotovertighten.Overtighteningcandamagethe
screws,greatlyreducingtheirholdingpower.
• Nevertighteninexcessof80in.•lb(9N.M.).
• Makesurethatmountingscrewsareanchoredintothecenterofthestud.Theuseofan"edgetoedge"studnder
ishighlyrecommended.
• Hardwareprovidedisforattachmentofmountthroughstandardthicknessdrywallorplasterintowoodstuds.Install-
ersareresponsibletoprovidehardwareforothertypesofmountingsituations.
WARNING