


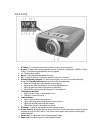

Operation
1. Remove the lens cap.
2. When switching on, first switch on the projector and then the computer. Press any button
on projector or remote control to switch on the projector. The Standby indicator lights up
orange. Then, when the projection lamp comes on, the Standby indicator lights up green
and the start-up screen appears for several seconds.
3. Select the required source, Computer, by pressing the Source button repeatedly
4. Turn on the computer.
Adjusting
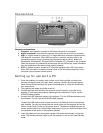
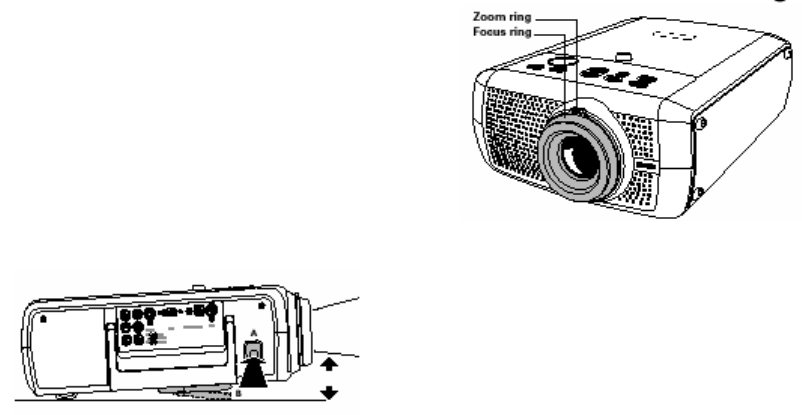
• Use the Zoom ring to adjust the size of the
image.
• Use the Focus ring to adjust the focus of the
image.
• To raise: Keep knob A pressed and lift to raise
the projector. The Height/Level Adjuster B will
come out.
• To lower: Keep knob A pressed and gently
lower the projector.
• If projector and screen are not properly placed, the picture will be distorted,
producing a keystoned image (picture top width larger than picture bottom width
or vice versa). ‘Keystone correction’ allows you to correct picture distortion of the
vertical keystone type by internal scaling. This correction function is accessible
through the ‘Keystone Correction’ option in the ‘Settings’ menu of the On Screen
Display (OSD) menu.
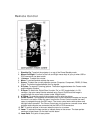
• Pressing the menu button will give you access to many setting that can be
adjusted including: zoom, brightness, contrast, color temperature, volume, bass,
treble, keystone correction, lamp life, and more.
Standby Mode
Please put the projector in the Power/Standby position if you are not going to use the
projector for more than 15 minutes. When no signal inputs are detected for 30 minutes,
the projector automatically switches to Power/ Standby (Auto Standby).
1. Press the Standby button to switch the projector back into the Power/Standby mode. The
Standby Warning screen will appear for 20 seconds.
2. Press the Standby button again to confirm.
3. The projector will now go into Power/Standby mode. You can also press the Standby
button twice in succession to switch the projector into Power/Standby mode immediately.