


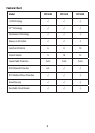


5
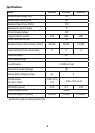
Front Panel Indicators
A series of intelligent LED indicators on the front panel of Theatre Director keep you informed of the
power status at all times. The red light lets you know that the surge protection function is ready
in the event it is needed. The green light lets you know that your electrical system is wired and
grounded properly. The range of blue lights let you know what your current input voltage level is.
The main power switch, also located on the front panel, turns power on and o to all switched AC
outlets. This single switch can be used to conveniently power on and o all components plugged
into the switched outlets with the touch of one button.
Connecting Your Equipment
1. Place Theatre Director in the desired location of your home theater system. Attach the rack-
mount brackets, if desired, as described in the “Rack-mount Brackets” section of the Features
above.
2. Plug the A/V components – that do not require a constant power source – into the switched
AC outlets. These components can be powered on and o simultaneously with the main power
switch on the front panel of Theatre Director.
3. Plug the A/V components that do require a constant power source (i.e., VCR, DVR, TiVo
TM
, etc.)
into the always-on AC outlets. Power to these components will not be controlled by the main
power switch on the front panel of Theatre Director.
4. As needed, connect the incoming coaxial, RJ45 networking and RJ11 phone lines to the
corresponding IN jacks.
5. Connect additional coaxial, RJ45 networking and RJ11 phone line cables from the OUT jacks on
Theatre Director to the corresponding inputs on the A/V components.
6. Plug the main power cord into a standard 110V AC outlet.
7. Press the main power switch on the front panel – the switch will illuminate blue when power
is on.
8. Operate the home theater system per the instructions supplied with the components.