


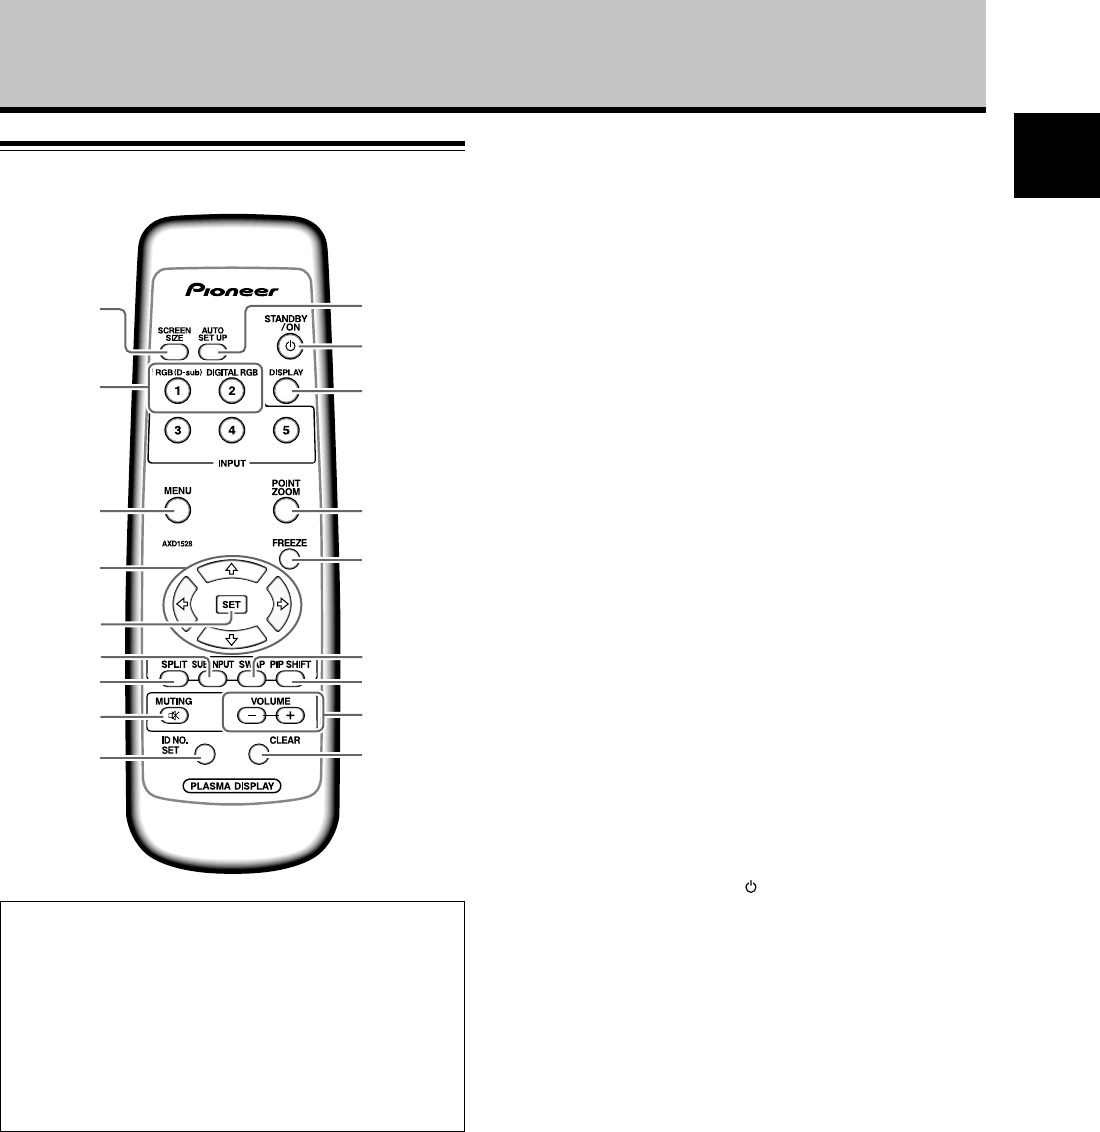
5
En
English
-
=
0
~
!
#
%
$
2
3
7
@6
8
9
1
5
4
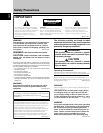
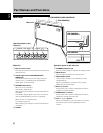
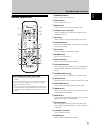
Remote control unit
Part Names and Functions
When handling the remote control unit
¶ Do not drop the remote control unit or expose it to
moisture.
¶ Do not use the remote control unit in a location subject to
direct sunlight, heat radiation from a heater, or in a place
subject to excessive humidity.
¶ When the remote control unit’s batteries begin to wear out,
the operable distance will gradually become shorter. When
this occurs, replace all batteries with new ones as soon as
possible.
1 SCREEN SIZE button
Press to select the screen size.
2 INPUT buttons
Press to select the input.
3 MENU button
Press to open and close the on-screen menu.
4 ADJUST (5/∞/3/2) buttons
Use to navigate menu screens and to adjust various
settings on the unit.
5 SET button
Press to adjust or enter various settings on the unit.
6 SUB INPUT button
During multi-screen display, use this button to change
inputs to subscreens.
7 SPLIT button
Press to switch to multi-screen display.
8 MUTING button
Press to mute the volume.
9 ID NO. SET button
Button used by professional installers.
0 AUTO SET UP button
When using computer signal input, automatically sets
the [POSITION], [CLOCK] and [PHASE] to optimum
values.
- STANDBY/ON button ( )
Press to put the unit in operation or standby mode.
= DISPLAY button
Press to view the unit’s current input and setup mode.
~ POINT ZOOM button
Use to select and enlarge one part of the screen.
! FREEZE button
When memo screen function is enabled, a still image
is displayed in the subscreen.
@ SWAP button
During multi-screen display, use this button to switch
between main screen and subscreen.
# PIP SHIFT button
When using the picture-in-picture mode with multi-
screen display, use this button to move the position of
subscreen.
$ VOLUME (+/–) buttons
Use to adjust the volume.
% CLEAR button
Button used by professional installers.