


Chapter One: The Installation Express
If you are an experienced technician who has installed Clean Screen II PCs, then check out
Chapter One: The Installation Express. It covers the major steps. If you are the least bit unsure
of any step, please resume reading the rest of the manual.
1. Review the Before You Begin section of the manual — especially its Safety Instructions.
2. Unpack the Clean Screen II PC and save the packing.
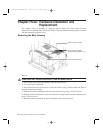
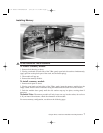
3. If you need to add memory or a hard drive, read Chapter Three: Hardware Installation and
Replacement for details.
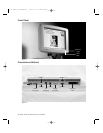
4. Connect the keyboard, network, mouse, and any other peripherals. If you need help, refer to
Chapter Four: System Setup.
5. Before connecting the power, make sure the power switch is in the off (O) position. Connect
the power.
To prevent damage to the Clean Screen II, ensure correct orientation of the
power connector before plugging it into the unit. Always secure the connector
in place before turning on the Clean Screen II.
6. Turn on the unit.
7. Press <F2> immediately when prompted to enter the CMOS Setup. The screens are self-
explanatory. If a floppy disk is required for setup, you will need to enable drive “A.”
8. If your system was purchased without an operating system, you will need to use a boot disk
to create disk partitions and format the HDD before installing your operating system.
9. Load any drivers necessary for your system from the IS Manager’s Kit. Follow the
Readme.doc and other information on the disks.
10. Load your application software.
11. You may want to read the rest of the manual. There are many helpful details about your new
Clean Screen II PC, especially in the REFERENCE GUIDE section.
While the LCD display has a 25,000-hour back light life, the use of power
management to turn off the display when not in use is highly recommended.
Chapter One: The Installation Express 1
CS II Manual LAYOUT#2304 3/25/99 11:16 AM Page 1