


TD3200 User Manual
6
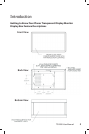
Placing your Monitor
When used on a countertop or other supporting surface, the TD3200 can be
oriented in landscape or portrait mode. Be certain to determine the table
or countertop can safely support the 55lb (121kg) weight of the TD3200
display box plus the weight of the added contents. In landscape mode we
recommend the access door be oriented on top but in portrait mode there is
no preferred orientation as to which short side is on top.
The TD3200 can also be mounted using the VESA Flat Panel Mounting
Physical Mounting Interface Standard incorporated into the back plate of
the display. Please refer to the REAR VIEW drawing in the prior section for
mounting pattern dimensions. Again, be certain to check to make sure
the mount is capable of supporting the weight of the TD3200 display box
plus contents. Planar recommends using UL or similarly tested mounting
hardware. In mounting the display on a stand using the 200 mm square
VESA pattern, use the four adjacent holes in the center of the unit. We don’t
recommend using the outer 200 mm square pattern by itself.
To mount the monitor on a swing-arm or other mounting xture, follow the
instructions included with the mounting xture to be used. Again, Planar
recommends using UL or similarly tested mounting hardware.
If the monitor is placed against a wall or with the backside against a
countertop, we recommend installing the four rubber feet into the
threaded inserts located at the corners of the backside of the display.
This will permit spacing for cooling ventilation and also allow room for
the power and video cables.
WARNING – For wall or swing-arm VESA mounting, you must
select the proper screw length! Your M6 mounting screws
should protrude no more than 5/8" (16 mm) into the VESA
mount threaded holes (see REAR VIEW gure in prior section).
Use of longer screws can damage the monitor. For example,
if your VESA mounting bracket is ¼" (6mm) thick, use 20
or 22 mm long M6 screws.