


PLANET Technology Corp. GRT-101/401 User’s Manual
- -
8
Chapter 3 Configuration
3.1 Purpose
This chapter provides information about configuring GRT-101/GRT-401.
Note: After you have completed all necessary setting for GRT-101/GRT-401, make sure to write the new configuration
to NVRAM by “write” command and reboot the system, or all of your changes will not take effect.
3.2 Logon Procedure
There are three methods to logon to GRT-101/GRT-401: serial console, Telnet,
and web interface. For the first time configuration, perhaps only the serial
console mode could be used because applications requiring Internet protocol
(IP) communication, such as Telnet and web interface, are not available unless
a management IP is configured properly for your local networking
environment.
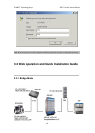
After connecting all the necessary cables described in Chapter 2 Installation,
power on GRT-101/GRT-401 and select one of the following procedures to
access GRT-101/GRT-401.
Note: It is recommended that only one configuration application is used to setup GRT-101/GRT-401 at any given time,
that is, Telnet, serial console and the web management interfaces should not be used simultaneously.
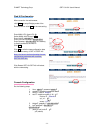
3.2.1 Serial console
Check the connectivity of the RS-232 cable from your computer to the serial
port of GRT-101/GRT-401. Start your terminal access program with VT100
terminal emulation. Configure the serial link with baudrate of 9600, 8 data bits,
no parity check, 1 stop bit, and no flow-control, and press the SPACE key until
the login screen appears. When you see the login screen, you can logon to
GRT-101/GRT-401.
User: admin
Password: *****
Note: If you have not set any user profile for GRT-101/GRT-401, enter the factory default user “admin”. When the
system prompts you for a password, type “admin” to enter GRT-101/GRT-401.