


Part 8
LCD CASHIER DISPLAY
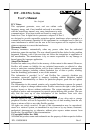
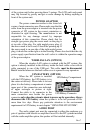
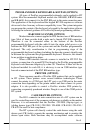
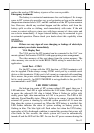
Push down the round plastic
button at rear of the display base as
circled in right picture to adjust the
display up and down. Release the
button when done will lock the panel
firmly for application. Pushing the
rectangular shape plastic button to its
right toward the base center allows user to adjust the display horizontally for
best view angle.
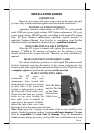
CUSTOMER DISPLAY (OPTION) OR 2
ND
DISPLAY
When the HT series is ordered with the customer
display PD-2601 or PD-7321 option, the customer display
together with the pole for installing them to corner of back
cable cover will be delivered in separate package from the
system unit. Please follow the
Installation Guide in package of the
option. The customer display will occupy
one USB or COM port in the connection
area. Same concept applies to the LM-2010 2
nd
display
monitor. However, the port for LM-2010 is the VGA
connector.
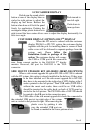
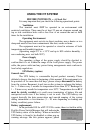
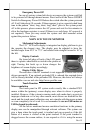
SIDE MOUNT UPGRADE KIT (SD-300/BC-300/KP-200 OPTION)
When a side-mount upgrade kit option SD-300 or BC-300 is ordered
with the HT system, this option is already installed in the delivery. If they were
to be later installed or if the side mount upgrade kit is KP-200,
they have to be mounted to the right edge of LCD display at the 2
screws pointed in the left picture. Their USB cable (If KP-200 is
without the smart card reader, there could be no USB cable.)
should be inserted in the cable hook on back of LCD panel as
circled in the left picture. The PS/2 KB cable of KP-200 should
be routed to the KB port in the connection area.
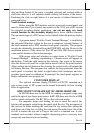
The USB cable of the side mount upgrade kit should be connected to
the extended USB port at top right edge of the system
unit as circled in the picture at right. After removing the
plastic cover by pushing it side
way, the extended USB port can
be found as marked in the lower picture at left.
Push inward to
turn left-right
Push down to
turn up-down